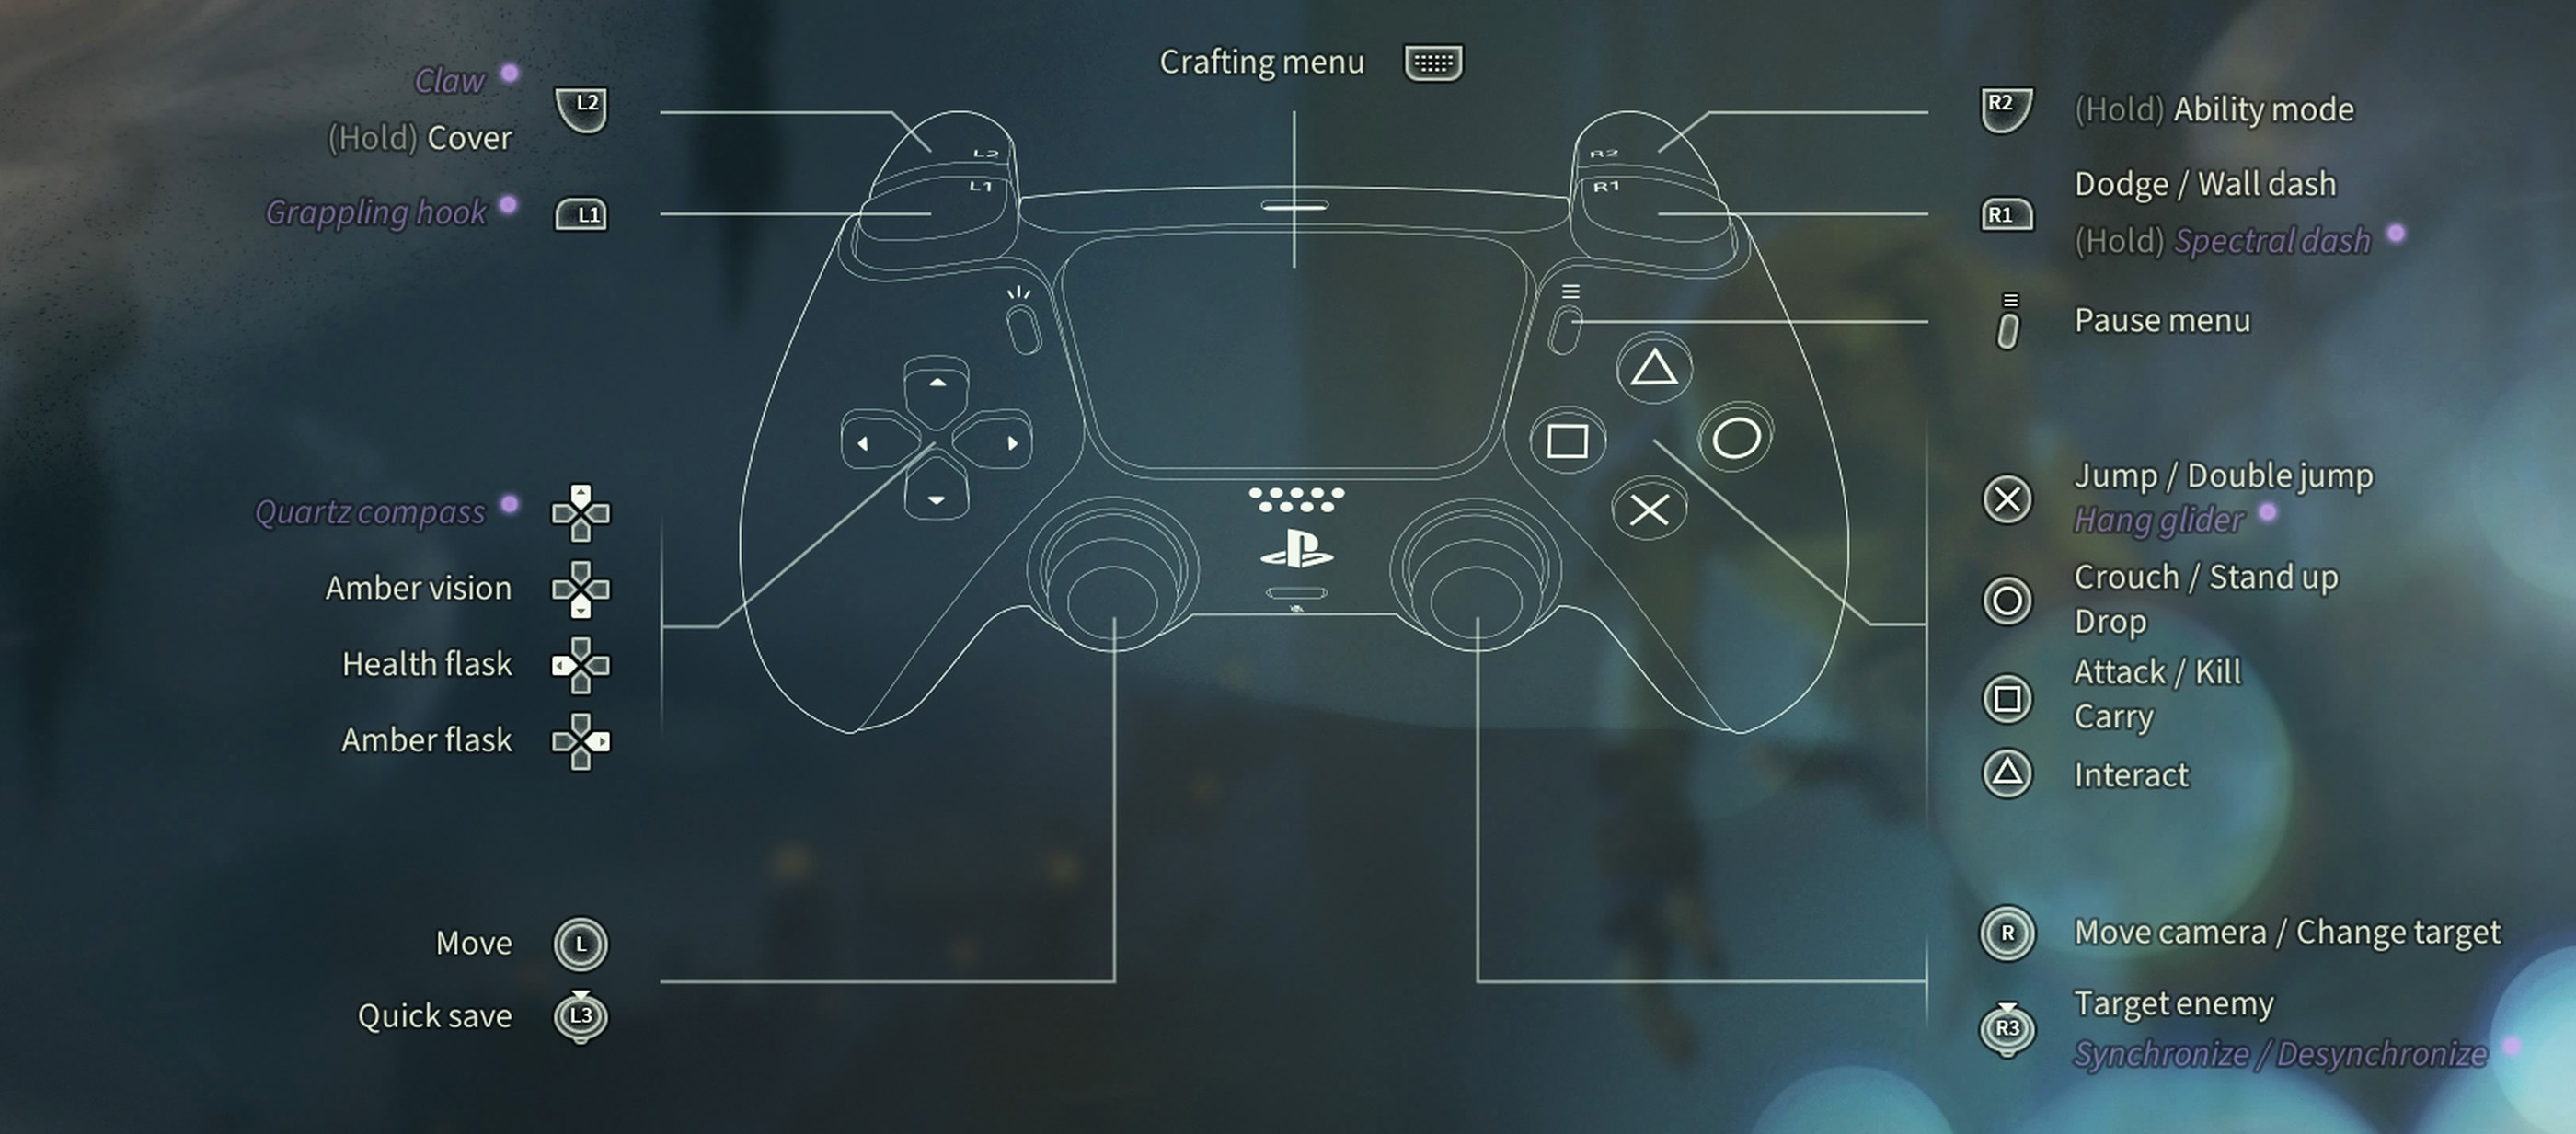
Styx: Blades of Greed uses a contextual control scheme built around stealth, climbing and rapid vertical movement. A single button may perform several related actions depending on Styx's position: Cross jumps, double-jumps or deploys the Glider; Circle changes stance or drops from a ledge; Square attacks, performs a silent kill or picks up a body.
The shoulder buttons contain most of Styx's advanced tools. L2 readies the Claw and pulls him into cover, L1 fires the Grappling Hook, R1 dodges or performs a Wall Dash, and holding R2 opens Ability Mode. Several commands shown in the controller diagram remain locked until their corresponding story ability has been obtained.
Learning which actions are contextual is particularly important in crowded infiltration areas. Pressing Square beside an unaware guard may perform a kill, while the same button beside a corpse allows Styx to carry it. Likewise, L1 can provide traversal or trigger a Grapple Kill when the relevant upgrade and target conditions are available.
Styx: Blades of Greed Controls
| Action | PlayStation 5 | Xbox Series | PC |
|---|---|---|---|
| Move Styx | Left Stick | Left Stick | W / A / S / D |
| Move Camera | Right Stick | Right Stick | Mouse |
| Quick Save | Press L3 | Press Left Stick | Assigned Quick Save Key |
| Target Enemy | Press R3 | Press Right Stick | Assigned Target Key |
| Synchronize / Desynchronize | Press R3 when Unlocked | Press Right Stick when Unlocked | Assigned Synchronize Key |
| Jump | Cross | A | Space |
| Double Jump | Cross while Airborne | A while Airborne | Press Jump while Airborne |
| Deploy Hang Glider | Cross while Airborne when Unlocked | A while Airborne when Unlocked | Assigned Jump / Glider Key |
| Crouch / Stand | Circle | B | Assigned Crouch Key |
| Drop from Ledge | Circle | B | Assigned Drop Key |
| Attack | Square | X | Assigned Attack Key |
| Silent Kill | Square near Unaware Enemy | X near Unaware Enemy | Assigned Attack Key |
| Carry Body | Square near Body | X near Body | Assigned Attack / Carry Key |
| Interact | Triangle | Y | Assigned Interact Key |
| Open Door / Container | Triangle | Y | Assigned Interact Key |
| Pick Up Object | Triangle or Contextual Prompt | Y or Contextual Prompt | Assigned Interact Key |
| Dodge | R1 | RB | Assigned Dodge Key |
| Wall Dash | R1 near Compatible Wall | RB near Compatible Wall | Assigned Dodge / Wall Dash Key |
| Spectral Dash | Hold R1 when Unlocked | Hold RB when Unlocked | Assigned Spectral Dash Key |
| Open Ability Mode | Hold R2 | Hold RT | Hold Assigned Ability Mode Key |
| Activate Ability | Hold R2 + Displayed Face Button | Hold RT + Displayed Face Button | Ability Mode + Assigned Ability Key |
| Change Ability Set | Hold R2 + Displayed Direction | Hold RT + Displayed Direction | Assigned Ability Set Input |
| Use Grappling Hook | L1 | LB | Assigned Grappling Hook Key |
| Grapple to Anchor | L1 when Anchor Is Targeted | LB when Anchor Is Targeted | Assigned Grappling Hook Key |
| Grapple Kill | L1 when Unlocked and Prompted | LB when Unlocked and Prompted | Assigned Grapple Kill Key |
| Use Claw | L2 | LT | Assigned Claw Key |
| Take Cover | Hold L2 near Cover | Hold LT near Cover | Hold Assigned Cover Key |
| Move Along Cover | Hold L2 + Left Stick | Hold LT + Left Stick | Hold Cover + Movement Keys |
| Leave Cover | Release L2 / Move Away | Release LT / Move Away | Release Cover / Move Away |
| Use Quartz Compass | D-Pad Up | D-Pad Up | Assigned Quartz Compass Key |
| Use Amber Vision | D-Pad Left | D-Pad Left | Assigned Amber Vision Key |
| Use Health Flask | D-Pad Right | D-Pad Right | Assigned Health Flask Key |
| Use Amber Flask | D-Pad Down | D-Pad Down | Assigned Amber Flask Key |
| Open Crafting Menu | Touch Pad | View | Assigned Crafting Key |
| Open Game Menu / Pause | Options | Menu | Esc |
PC note: Keyboard and mouse commands can be customized. Because the installed binding preset may differ, check Settings > Controls for the exact keys currently assigned to Claw, Grappling Hook, Ability Mode, consumables and unlockable powers.
How Contextual Controls Work
Several buttons change function according to Styx's position and the object currently targeted. The game displays a prompt when a contextual action is available.
The most important contextual buttons are:
- Cross / A: Jump, Double Jump or deploy the Glider.
- Circle / B: Crouch, stand or release a ledge.
- Square / X: Attack, silently kill or carry a body.
- Triangle / Y: Interact with doors, containers, switches and objects.
- R1 / RB: Dodge, Wall Dash or Spectral Dash.
- L1 / LB: Grapple to an anchor or perform an unlocked Grapple Kill.
- L2 / LT: Use the Claw or remain attached to cover.
Watch the prompt rather than relying only on button memory. The same input can produce a very different result when Styx is beside a guard, body, ledge or grapple point.
Contextual Control Habit
Before pressing an attack or traversal button near several interactable objects, move the camera until the intended prompt is clearly displayed. This prevents Styx from grabbing a corpse when you meant to open a door or dropping from a ledge when you intended to jump.
Movement and Camera Controls
Use the left stick or WASD to move. The right stick or mouse independently controls the camera.
Styx is small enough to move under furniture, behind low barriers and through openings that larger characters cannot use. Keep the camera low when exploring cluttered rooms; useful hiding routes are often positioned beneath tables or behind shelving rather than at normal human eye level.
Walk Instead of Rushing
Fast movement creates more opportunities to enter a guard's vision or land noisily. Slow down near:
- Doorways.
- Patrol intersections.
- Sleeping or seated guards.
- Loose objects that may create noise.
- Brightly illuminated floors.
- Ledges above occupied areas.
The shortest route is not always the quietest. A longer path through rafters, crawl spaces or cover can preserve resources and avoid an alarm entirely.
Moving the Camera Before Styx
Inspect corners with the camera before moving Styx into the open. From cover or a high ledge, rotate the view to identify patrols, climbable walls and objects that can be used as distractions.
Do not walk backward through unexplored space while watching a guard. Another enemy or environmental hazard may be behind you.
Quick Save
Press L3 to create a Quick Save. The command is deliberately easy to reach because experimentation is a central part of the game.
Quick Save before:
- Attempting an unfamiliar assassination.
- Crossing a heavily guarded room.
- Using a rare consumable.
- Testing a Quartz or Amber ability.
- Jumping toward a distant ledge.
- Entering a restricted area.
- Trying to complete an optional objective without detection.
Do Not Replace Every Useful Save
A save made after Styx has been discovered, poisoned or trapped may be less useful than the previous checkpoint. Pause briefly and confirm that the current position is stable before pressing L3.
Keep occasional manual saves at important milestones where the menu allows them. Quick Save is excellent for immediate retries, while a separate save protects an earlier clean infiltration state.
Jumping and Double Jumping
Press Cross or A to jump. Press it again while airborne to perform a Double Jump.
The second jump can:
- Correct a slightly short leap.
- Reach a higher handhold.
- Change direction in midair.
- Move over a guard's line of sight.
- Reach a wall suitable for Wall Dash.
Save the Second Jump When Possible
Do not automatically double-jump at the beginning of every gap. Keeping the second input available lets you correct the landing after seeing Styx's true trajectory.
Control Landing Noise
Dropping directly onto a hard surface near a guard can create noise. Aim for carpet, fabric, hay or a higher intermediate ledge when possible.
A technically successful jump can still ruin stealth if Styx lands in a brightly lit or noisy position.
Hang Glider Controls
After the Hang Glider is unlocked, use the displayed Cross or A command while airborne to deploy it.
The Glider greatly expands traversal by allowing Styx to cross wide spaces, descend from towers and approach objectives from unexpected directions.
Deploy After Clearing the Ledge
Jump outward before opening the Glider. Deploying too close to a wall can leave insufficient space to establish a stable glide.
Plan the Landing Before Taking Off
Look for:
- A dark rooftop.
- An unguarded balcony.
- A chimney or upper opening.
- A ledge connected to another climbing route.
- A surface away from archers and lookout posts.
Do Not Glide Directly Through a Watcher's View
The Glider makes Styx mobile but does not make him invisible. Approach from behind structures and use height to stay outside obvious sightlines.
Crouching and Dropping from Ledges
Press Circle or B to crouch. Crouching lowers Styx's profile and allows him to use small spaces, low cover and furniture more effectively.
The same button releases Styx from a ledge while he is hanging. Check the ground before pressing it; a guard, fatal drop or noisy object may be directly below.
Use Crouch Before Entering Cover
Crouching before approaching low furniture makes Styx less visible during the final movement into concealment.
Drop in Stages
When descending a tall structure, release onto a lower ledge or platform instead of falling directly to the ground. Controlled descent reduces noise and prevents damage.
Attacking and Silent Kills
Press Square or X to attack. Against an unaware enemy in a valid position, the same command performs a silent kill.
A silent elimination is safest when:
- No other guard is watching the target.
- The body can be hidden immediately.
- The patrol will not be missed before you leave.
- The target is not protected by armour or another immunity.
- The kill animation will not leave Styx inside a bright area.
Combat Is an Emergency Option
Styx is designed as an infiltrator, not a frontline fighter. Once several enemies join a direct confrontation, escape is usually safer than continuing to attack.
Break sight, change elevation and hide until the alarm decreases. Winning one fight is not useful if its noise alerts the entire stronghold.
Do Not Eliminate Every Guard
Leaving patrols alive can be safer than creating suspicious gaps and corpses. Remove only enemies who block an important route or objective.
Carrying and Hiding Bodies
Press Square or X beside a body to pick it up when the Carry Body prompt appears.
Move bodies away from:
- Main patrol routes.
- Doorways.
- Brightly lit areas.
- Food tables and workstations used by guards.
- Alarm devices.
- Objective locations that will later become busy.
Use containers, dark corners, high ledges and isolated rooms where available.
Check the Destination First
Carrying a body slows movement and restricts some actions. Inspect the hiding place before lifting the corpse so you do not wander through the area looking for one.
Consider Gravity
A body dropped from a height may create noise or be discovered below. Use ledges only when the landing area is isolated.
Interacting with the Environment
Press Triangle or Y to interact with doors, containers, switches, loot, mechanisms and mission objects.
Interaction prompts can also allow Styx to:
- Open or close doors.
- Collect crafting materials.
- Steal valuables.
- Sabotage environmental objects.
- Poison suitable food or drink.
- Use hiding places.
- Read documents.
- Activate mission mechanisms.
Close Doors Behind You
Closing a door can interrupt a guard's direct view and provide time to climb or hide. It may also make an area appear undisturbed.
Inspect Food and Environmental Objects
Guards interact with their surroundings. A meal, torch, bell or breakable object may provide a quieter solution than attacking directly.
Dodge Controls
Press R1 or RB to dodge. Dodge is useful when an attack is already committed or when Styx needs to cross a short exposed gap.
Use Dodge to:
- Escape a melee swing.
- Move behind nearby cover.
- Break an enemy's tracking.
- Reach a wall suitable for Wall Dash.
- Create distance before using a gadget.
Do Not Dodge Without a Destination
Repeated evasive movement can carry Styx into another guard or off a ledge. Choose the safe space before pressing R1.
Wall Dash
R1 or RB also activates Wall Dash when Styx is moving beside a compatible wall.
Wall Dash lets him cross short gaps, maintain momentum and reach climbing points that cannot be accessed through a standard jump.
Approach the Wall at a Controlled Angle
Running directly into the wall may stop Styx instead of beginning the movement. Approach alongside it and press the command when the contextual animation becomes available.
Combine Wall Dash with Double Jump
Use a jump to reach the wall, Wall Dash across it and preserve the second jump for the final ledge where possible.
Spectral Dash
Hold R1 or RB after Spectral Dash has been unlocked. This Quartz-powered movement ability allows Styx to cross certain barriers and reach spaces unavailable through normal movement.
Spectral Dash is useful for:
- Passing through compatible grates or obstacles.
- Escaping a dangerous sightline.
- Reaching hidden areas.
- Bypassing conventional guard routes.
- Returning to locations that were inaccessible earlier.
Check the Destination
Passing through an obstacle does not guarantee the other side is safe. Use Amber Vision and the camera before committing.
Watch the Resource Cost
Quartz and Amber powers are valuable. Avoid using Spectral Dash for ordinary movement when climbing or the Grappling Hook can reach the same destination safely.
Grappling Hook Controls
Press L1 or LB while aiming at a compatible anchor. A valid grapple point is identified by the targeting interface.
The Grappling Hook allows Styx to:
- Reach upper ledges rapidly.
- Cross large gaps.
- Escape from ground-level guards.
- Enter towers through elevated openings.
- Create a new route after an alarm.
- Revisit regions with expanded access.
Look Up Frequently
Grapple anchors are often positioned above the normal camera view. Search roofs, cranes, beams and towers before assuming a wall cannot be crossed.
Use the Hook Before Detection
Escaping vertically is easier when Styx is already beneath a known anchor. Identify the emergency route before entering the guarded area.
Grapple Kills
After the relevant upgrade is unlocked, L1 or LB can perform a Grapple Kill when the correct prompt appears.
The ability can eliminate a target from an advantageous position, but it may move the body or Styx into a visible area. Confirm where the action will finish before activating it.
Prioritize Isolated Targets
A dramatic elimination is not silent enough to compensate for being watched by several guards. Use it against enemies separated from their patrol group.
Using the Claw
Press L2 or LT to use Styx's Claw where the movement or environmental context supports it.
The Claw helps Styx cling to and move across compatible walls, expanding the number of possible approaches through vertical environments.
Search for Climbable Surfaces
Not every wall accepts the Claw. Look for suitable textures, markings and level geometry rather than repeatedly pressing the command against a completely smooth barrier.
Climb Outside Guard Sightlines
A vertical surface may bypass a doorway but still remain visible from a courtyard. Use shadows and architectural cover during the ascent.
Taking Cover
Hold L2 or LT near a compatible corner or low barrier to take cover. Move with the left stick while maintaining the input.
Cover allows you to:
- Watch a patrol without exposing Styx's full body.
- Wait for an enemy to pass.
- Prepare a gadget or ability.
- Move around a corner safely.
- Break sight after partial detection.
Cover Is Not Invisibility
An enemy approaching from another angle may still see Styx. Check every entrance instead of concentrating entirely on the nearest guard.
Leave Cover Quietly
Release the trigger and move back into shadow rather than stepping directly into the patrol route.
Targeting Enemies
Press R3 to target an enemy. Targeting helps track a selected guard and prepares certain contextual actions.
Use it when:
- Planning a Grapple Kill.
- Tracking an enemy through a crowded room.
- Preparing an aimed ability.
- Following a patrol while moving the camera.
Do Not Let Targeting Control the Camera Poorly
Release or change the target when camera tracking prevents you from seeing another guard, ledge or escape route.
Synchronize and Desynchronize
The controller diagram lists Synchronize and Desynchronize on R3 as an unlockable contextual command.
Once the related ability is available, use the displayed prompt to establish or break the relevant supernatural connection. The command shares the targeting input, so its function depends on the active power and selected subject.
Do not repeatedly click R3 without checking the interface. Confirm whether the game currently displays Target, Synchronize or Desynchronize.
Ability Mode
Hold R2 or RT to open Ability Mode. While the mode is active, the face buttons and displayed directional controls activate powers assigned to the current ability set.
Ability Mode groups Styx's supernatural powers without permanently replacing the ordinary Jump, Crouch, Attack and Interact commands.
Using an Ability
- Hold R2 or RT.
- Review the ability icons.
- Select the required set if more than one is available.
- Press the corresponding face button.
- Release R2 or RT to return to normal controls.
Time Does Not Guarantee Safety
Opening Ability Mode does not make Styx invulnerable. Prepare the power from cover or another stable position rather than standing in front of an alerted enemy.
Learn Icon Positions
Ability assignments become faster when you remember their positions. Check the wheel after unlocking or rearranging a power before entering a difficult infiltration.
Amber and Quartz Powers
Styx's powers are divided across his established Amber abilities and newer Quartz techniques. Individual assignments depend on progression and the active setup.
Available powers can support actions such as:
- Creating distractions or deceptive copies.
- Concealing Styx.
- Manipulating enemies.
- Changing movement or perception.
- Passing through otherwise inaccessible spaces.
- Slowing or controlling a dangerous situation.
Use Powers to Remove a Specific Problem
Do not activate a supernatural ability merely because the resource bar is full. Decide whether it will bypass a lookout, separate a patrol, create an escape or open a route unavailable through ordinary stealth.
Combine Powers with the Environment
A distraction is more effective when it moves guards away from a climbable wall, poisoned food or grapple route. Powers should support the infiltration plan rather than replace one.
Quartz Compass
Press D-Pad Up to use the Quartz Compass. It helps orient Styx toward Quartz-related objectives or points of interest.
Use It from Open Vantage Points
The compass indicates direction more clearly when you can compare it with visible towers, bridges and routes.
Direction Is Not a Complete Route
The direct line may pass through a guarded fortress, inaccessible wall or vertical obstacle. Use the compass to establish the destination, then select a safe path through the environment.
Amber Vision
Press D-Pad Left to activate Amber Vision. This perception mode highlights useful environmental and tactical information.
Use Amber Vision to inspect:
- Enemy positions.
- Interactive objects.
- Useful routes.
- Environmental hazards.
- Loot or materials.
- Targets connected to the current objective.
Scan Before Entering
Activate Amber Vision from cover before crossing a doorway or dropping into a lower room.
Do Not Remain Dependent on the Filter
Constant use can make normal environmental detail harder to read. Scan, remember the important positions and return to the ordinary view before moving.
Health Flask
Press D-Pad Right to use a Health Flask. Healing requires a safe moment and does not compensate for remaining surrounded.
Heal after:
- Breaking line of sight.
- Climbing to an isolated ledge.
- Closing a door.
- Escaping into a hiding place.
- Reaching a quiet checkpoint.
Do not spend a flask on minor damage when the current route is nearly complete and no further danger is expected.
Amber Flask
Press D-Pad Down to use an Amber Flask. It restores the resource used by Amber-related powers.
Restore Amber Before a Difficult Infiltration
Use the flask before entering a major guarded area when your planned route depends on invisibility, clones or another Amber technique.
Do Not Refill Without a Plan
A full resource bar has little value when you continue using only conventional movement. Preserve the flask until a known obstacle justifies it.
Crafting Menu
Press the Touch Pad on PlayStation or View on Xbox to open the Crafting Menu.
Crafting allows collected materials to become useful infiltration tools, consumables and gadgets. Available recipes depend on progress and unlocked skills.
Craft for the Current Mission
Before spending materials, consider whether the objective involves:
- Dense groups of guards.
- Armoured targets.
- Bright open spaces.
- Long routes without resupply.
- Optional objectives requiring complete stealth.
- Repeated use of Amber or Quartz powers.
Keep Emergency Supplies
Do not convert every material into one favourite gadget. Maintain enough flexibility to craft a healing resource or another tool after the situation changes.
Unlockable Controls
The purple lock symbols in the attached controller diagram identify actions obtained through story progression or upgrades.
These include:
- Hang Glider.
- Spectral Dash.
- Grapple Kill.
- Synchronize and Desynchronize.
- Additional Ability Mode powers.
A locked command is not a control error. Continue the campaign until the corresponding tool or power becomes available.
Return to Earlier Regions
New traversal controls are designed to open paths in locations already visited. Recheck high ledges, grates, towers and distant platforms after receiving the Grappling Hook, Glider, Claw or Spectral Dash.
How to Remap Controls
- Open the Game Menu.
- Select Settings.
- Open the Controls or input section.
- Select Controller or Keyboard and Mouse.
- Highlight the action you want to change.
- Press the replacement input.
- Resolve any displayed conflict.
- Apply the configuration.
- Test movement and Ability Mode in a safe area.
Recommended Remapping Advice
Keep Dodge Accessible While Moving the Camera
Dodge is an emergency action. It should remain available without removing your thumb from the right stick.
Keep Ability Mode Separate from Attack
An accidental power activation can consume a limited resource. Use distinct buttons for ordinary combat and supernatural abilities.
Do Not Move Quick Save Beside a Frequently Pressed Command
An unintended save during an alarm can replace a useful retry point.
Keep Grappling Hook on a Shoulder Button
The hook often requires simultaneous camera aiming and movement. A shoulder input leaves both thumbs available.
Test Every Context
After remapping, test Jump, Double Jump, Glider, Wall Dash, cover, carrying bodies and Ability Mode. A layout that works during ordinary movement may become uncomfortable during contextual actions.
Controller and Camera Settings
Camera Sensitivity
Use a sensitivity fast enough to check behind Styx but slow enough to target small grapple anchors and environmental objects.
Aiming Sensitivity
Lower it when the targeting cursor repeatedly moves past enemies or grapple points.
Camera Inversion
Horizontal and vertical inversion should be selected according to comfort. There is no stealth advantage to either option.
Controller Vibration
Vibration can reinforce movement and detection feedback. Reduce it when repeated effects become distracting during precise climbing.
Accessibility Options
Available accessibility features include subtitles and visual-support options, including filters for deuteranopia, protanopia and tritanopia.
Enable subtitles when overheard guard dialogue is difficult to follow. Conversations can reveal patrol behaviour, objectives and environmental opportunities.
Colour-vision filters can make detection indicators, prompts and other interface information easier to distinguish.
Frequently Asked Questions
What are the default PlayStation controls?
Cross jumps, Circle crouches or drops, Square attacks or carries bodies, Triangle interacts, R1 dodges, R2 opens Ability Mode, L1 uses the Grappling Hook and L2 controls the Claw or cover.
How do you Quick Save?
Press L3 on PlayStation or the left stick on Xbox.
How do you use Amber Vision?
Press D-Pad Left.
How do you use the Quartz Compass?
Press D-Pad Up.
How do you heal?
Press D-Pad Right to consume a Health Flask.
How do you restore Amber?
Press D-Pad Down to use an Amber Flask.
How do you open the Crafting Menu?
Press the Touch Pad on PlayStation or View on Xbox.
How do you open Ability Mode?
Hold R2 or RT, then press the button assigned to the desired power.
How do you use the Grappling Hook?
Aim at a compatible anchor and press L1 or LB.
How do you perform a Grapple Kill?
Unlock the relevant ability, target a valid enemy and press L1 or LB when its contextual prompt appears.
How do you take cover?
Hold L2 or LT near a compatible corner or low barrier.
How do you use the Claw?
Press L2 or LT near a compatible climbing surface.
How do you perform a Wall Dash?
Move beside a compatible wall and press R1 or RB.
How do you use Spectral Dash?
After unlocking it, hold R1 or RB in a valid situation.
How do you deploy the Hang Glider?
After unlocking it, use the displayed Cross or A input while airborne.
How do you carry a body?
Stand beside it and press Square or Xbox X when the Carry Body prompt appears.
Why does Square perform different actions?
It is contextual. The same button attacks, silently kills or carries a body depending on Styx's position and the selected target.
Why can I not use the Glider or Spectral Dash?
Those controls remain locked until the corresponding story ability has been obtained.
Can the controls be remapped?
Yes. Controller and keyboard commands can be customized through the Controls menu.
Does the PC version support controllers?
Yes. It supports compatible Xbox and PlayStation controllers and can display matching button prompts.
Is open combat recommended?
No. Styx has limited durability, and direct combat becomes extremely dangerous when several enemies are alerted.
What is the most important beginner control?
Quick Save with L3 before experimenting. It lets you test stealth routes, powers and environmental solutions without repeating a long section.
Final Control Advice
Styx: Blades of Greed becomes much smoother once its buttons are understood as groups of related actions. Cross governs airborne movement, Square handles physical attacks and bodies, R1 controls evasive traversal, L1 manages the Grappling Hook and L2 connects Styx to walls and cover.
Use Amber Vision before entering a guarded space, identify a grapple or climbing escape route and create a Quick Save before committing. The strongest control combination is rarely an elaborate assassination; it is the sequence that lets Styx enter, steal what he needs and leave without anyone realizing he was there.
Continue with our Styx: Blades of Greed Tips and Tricks Guide for stealth routes, Quartz powers, Amber abilities, crafting, runes, gadgets, enemy awareness and exploration advice.
Comments
No comments yet. Be the first to share your thoughts!