Eriksholm: The Stolen Dream uses a compact control scheme built around observation, character switching and carefully timed stealth actions. Rather than controlling an entire squad simultaneously, you move Hanna, Alva and Sebastian individually, positioning each character where their particular skill can solve part of the encounter.
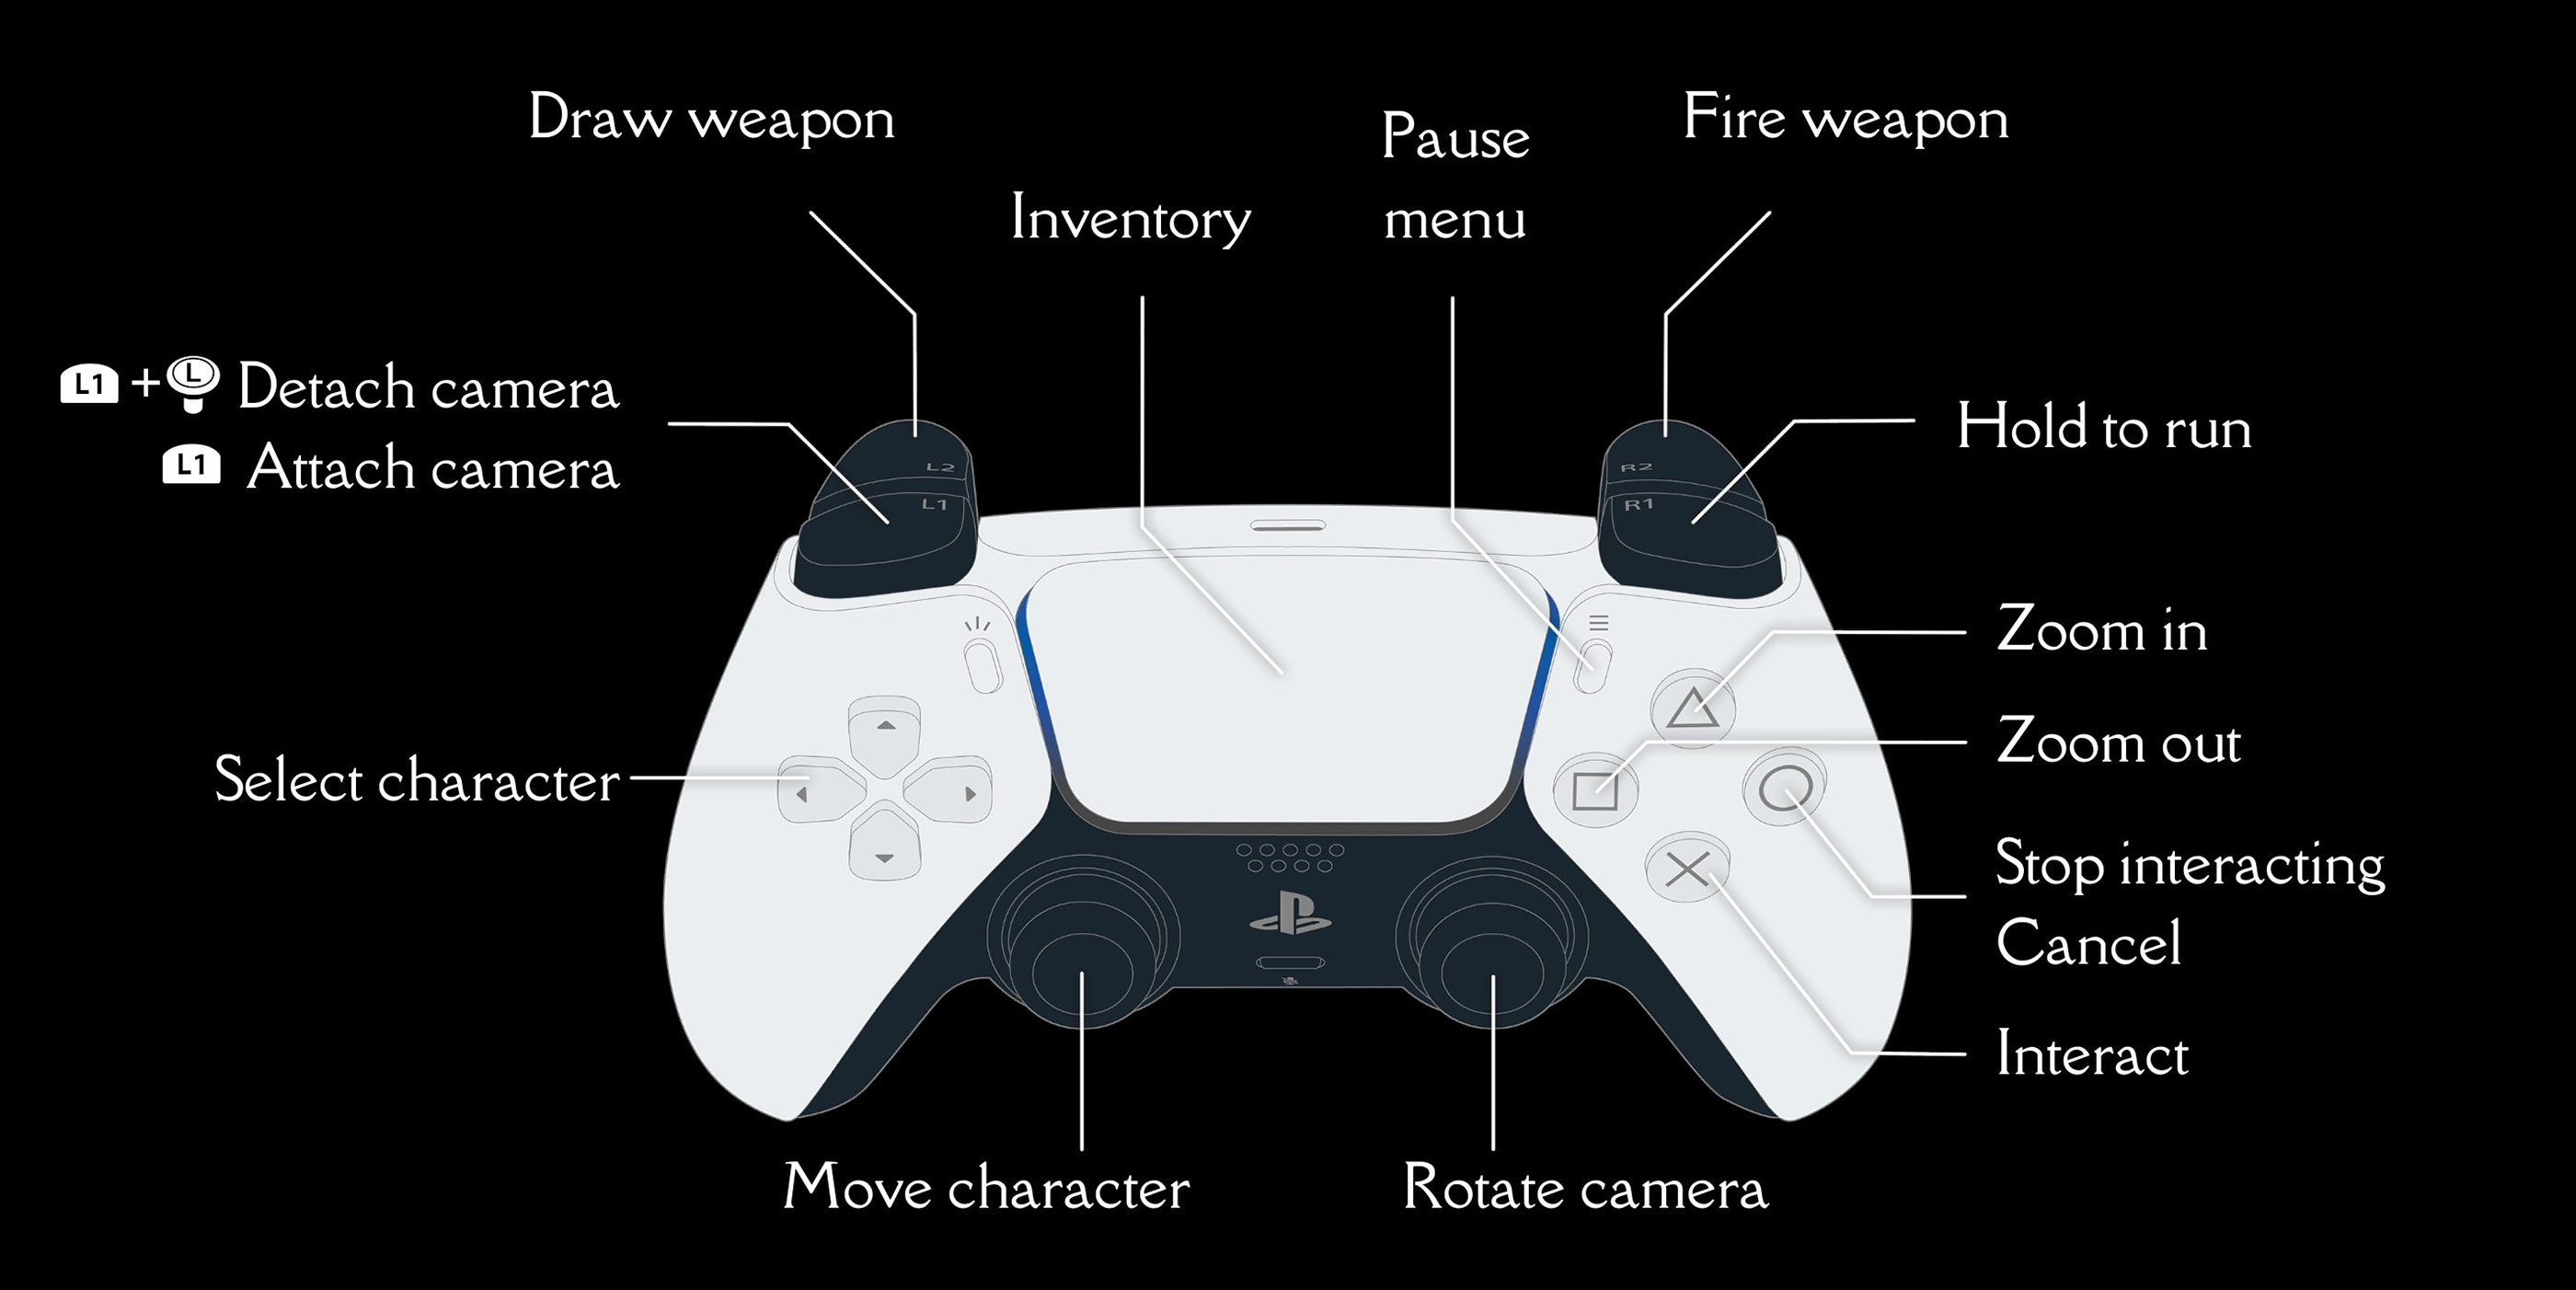
The attached PlayStation 5 controls screen confirms the default controller layout in build 1.4. The left stick moves the active character, the right stick rotates the isometric camera, the D-Pad switches between available characters, L2 draws the current character's weapon and R2 uses it. R1 must be held to run, while L1 attaches the camera to the active character.
Several buttons change purpose according to the current situation. Cross interacts with objects and hiding places, while Circle cancels an action or stops an ongoing interaction. Triangle and Square adjust the camera zoom, helping you inspect patrol routes or obtain a closer view of narrow interiors.
Eriksholm: The Stolen Dream Controls
| Action | PlayStation 5 | Xbox Series X|S | PC |
|---|---|---|---|
| Move Active Character | Left Stick | Left Stick | Click Destination / Assigned Movement Input |
| Rotate Camera | Right Stick | Right Stick | Assigned Camera Input / Mouse |
| Run | Hold R1 while Moving | Hold RB while Moving | Hold Assigned Run Input |
| Interact | Cross | A | Assigned Interact Input |
| Enter Hiding Place | Cross when Prompted | A when Prompted | Assigned Interact Input |
| Use Contextual Object | Cross when Prompted | A when Prompted | Assigned Interact Input |
| Stop Interacting | Circle | B | Assigned Cancel Input |
| Cancel Current Action | Circle | B | Assigned Cancel Input |
| Zoom Camera In | Triangle | Y | Assigned Zoom In Input / Mouse Wheel |
| Zoom Camera Out | Square | X | Assigned Zoom Out Input / Mouse Wheel |
| Select Hanna | Displayed D-Pad Direction | Displayed D-Pad Direction | Assigned Character Selection Key |
| Select Alva | Displayed D-Pad Direction | Displayed D-Pad Direction | Assigned Character Selection Key |
| Select Sebastian | Displayed D-Pad Direction | Displayed D-Pad Direction | Assigned Character Selection Key |
| Cycle or Select Available Character | D-Pad | D-Pad | Character Selection Keys |
| Attach Camera to Active Character | L1 | LB | Assigned Attach Camera Input |
| Detach Camera | L1 + Displayed Movement Input | LB + Displayed Movement Input | Assigned Detach Camera Input |
| Draw Current Character's Weapon | L2 | LT | Assigned Draw / Aim Input |
| Aim Weapon | Hold L2 and Position Target | Hold LT and Position Target | Hold Assigned Aim Input |
| Fire Weapon | R2 while Weapon Is Drawn | RT while Weapon Is Drawn | Assigned Fire Input |
| Use Hanna's Blowpipe | Hold L2, Aim, then R2 | Hold LT, Aim, then RT | Aim, then Fire |
| Use Alva's Slingshot | Hold L2, Aim, then R2 | Hold LT, Aim, then RT | Aim, then Fire |
| Perform Sebastian's Contextual Takedown | Cross when Prompted behind a Valid Guard | A when Prompted behind a Valid Guard | Assigned Interact / Takedown Input |
| Open Inventory | Touch Pad | View Button | Assigned Inventory Key |
| Pause Game | Options | Menu Button | Esc |
PC note: Eriksholm supports keyboard and mouse as well as compatible controllers. PC movement and camera behaviour differ naturally from the console layout, and bindings may be changed by the player. Check the active configuration under Settings > Controls rather than relying on a key that may have been remapped.
How the Controls Work
Eriksholm is closer to a real-time stealth puzzle than a traditional action game. Most inputs are intentionally simple because the challenge comes from choosing the correct character, route and moment.
The controller is divided into several clear groups:
- Left Stick and R1: Move and run with the active character.
- Right Stick, Triangle and Square: Rotate and zoom the camera.
- D-Pad: Select one of the currently available characters.
- Cross and Circle: Start or cancel contextual interactions.
- L1: Attach, centre or detach the tactical camera.
- L2 and R2: Prepare and fire the active character's weapon.
- Touch Pad: Open the inventory.
The game displays prompts beside usable objects, hiding spots, traversal routes and guards. Read the prompt before pressing Cross because the same input may enter a hiding place, climb through an opening, collect an object or perform a character-specific action.
Moving the Active Character
Use the left stick to move the selected character. On PC, movement can be directed with the active mouse or keyboard configuration.
Characters follow navigable paths automatically, but movement is not completely risk-free. A destination may pass through a guard's vision cone or take the character around an exposed side of an obstacle.
Move in Short Sections
Instead of sending a character across an entire courtyard, move between nearby pieces of cover. Short movements make it easier to stop when a patrol unexpectedly turns.
Watch the Complete Route
The final destination may be hidden, but the path leading to it may cross an exposed doorway. Rotate the camera and inspect the full journey before committing.
Avoid Moving Several Characters Together
Each companion should usually occupy a deliberate position. Sending everyone through the same path can place a vulnerable character inside a route intended only for another member of the group.
Running
Hold R1 or RB while moving to run. Running is useful when crossing a temporarily safe opening, escaping an approaching patrol or covering a long distance outside guarded areas.
Run when:
- A guard has just turned away.
- A distraction provides only a short window.
- You must reach a hiding place before a patrol returns.
- The route has already been inspected.
- No nearby enemy can hear or see the movement.
Do Not Run into Unexplored Space
Speed reduces the time available to react. Walk the first time you enter an unfamiliar area, identify patrol behaviour and then use running during the solved sequence.
Release R1 Before a Precise Interaction
Slow down near ladders, vents, hiding spots and takedown positions. Running past the interaction point can ruin a carefully timed opening.
Rotating the Camera
Use the right stick to rotate the isometric camera. Camera rotation is essential because buildings, walls and foreground objects can conceal guards or useful routes.
Before moving, rotate around the area to locate:
- Every visible guard.
- Patrol destinations.
- Doors and narrow passages.
- Hiding places.
- Lights that Alva can break.
- Vents accessible to Hanna.
- Drainpipes and climbing routes for Alva.
- Water routes available to Sebastian.
Check Behind Foreground Architecture
The default angle may hide a small alley, guard or collectible behind a roof. Rotate until the foreground obstruction no longer covers the route.
Keep the Next Patrol in View
Do not centre the camera only on the controlled character. Frame the character and the nearest threat together whenever possible.
Attaching and Detaching the Camera
Press L1 or LB to attach or centre the camera on the active character. The attached control diagram also displays a combined L1 movement command for detaching the camera and inspecting the surrounding environment independently.
An attached camera is useful when:
- Moving through narrow interiors.
- Following a character across a long route.
- Performing an interaction that requires close framing.
- You have lost track of the selected character.
A detached camera is useful when:
- Scouting beyond the character's immediate location.
- Studying the complete patrol cycle.
- Planning where another character should wait.
- Checking the destination of a vent, pipe or water route.
Scout Before You Commit
Detach the camera and examine the encounter before moving anyone. Information is the game's most valuable resource.
Reattach Before Precise Movement
Once the route is understood, centre the camera again so the active character remains easy to track.
Zooming the Camera
Press Triangle or Y to zoom in. Press Square or X to zoom out.
Use Zoomed-Out View for Planning
A wider view helps you understand:
- How multiple patrol routes overlap.
- Where each character should wait.
- Which guard will respond to a distraction.
- How far a weapon can reach.
- Whether a route reconnects with another part of the area.
Use Zoomed-In View for Execution
A closer view is useful when aiming at a specific guard or light, entering a small hiding place or distinguishing between nearby interaction points.
Change Zoom During the Encounter
Do not remain locked to one distance. Plan from a wide view and zoom closer when timing the final action.
Switching Characters
Use the D-Pad to select Hanna, Alva or Sebastian once they have joined the active group. The available directions and portraits are displayed by the interface.
Switch characters to:
- Position one member while another guard is distracted.
- Prepare a weapon user before moving the next character.
- Use a unique vent, climbing or swimming route.
- Create a chain of actions across different locations.
- Check whether a character-specific interaction is available.
Confirm Who Is Selected
Before pressing L2 or Cross, check the active portrait and character highlight. An accidental command may expose a companion waiting elsewhere.
Park Characters in Safe Positions
Before switching away, leave the current character:
- Outside all vision cones.
- Away from a patrol's turning point.
- Inside a valid hiding place when available.
- Close enough to perform the next planned action.
Do Not Advance One Character Too Far
Some encounters require one companion to assist another from the previous area. Move the team forward in stages rather than rushing the most mobile character to the exit.
Interacting with Objects
Press Cross or A when a contextual prompt appears. Interactions include doors, ladders, vents, hiding places, collectibles, switches and character-specific routes.
When a prompt does not appear:
- Move slightly closer.
- Face the interaction point.
- Change to the appropriate character.
- Move the camera so the object is unobstructed.
- Check whether a guard is preventing the action.
- Complete an earlier step in the encounter.
The Wrong Character May Be the Problem
Hanna, Alva and Sebastian cannot use every route. A vent that does nothing for Alva may be intended for Hanna, while a drainpipe may require Alva.
Cancelling and Stopping an Interaction
Press Circle or B to stop interacting or cancel the current action.
Use cancel when:
- A guard changes direction unexpectedly.
- You targeted the wrong light or enemy.
- The active character begins entering an unsafe route.
- You need to leave a hiding place at a different time.
- You opened an action but no longer want to commit.
Cancel Early
Do not wait for a patrol to fully detect the character. Abandon the interaction as soon as the timing becomes unsafe.
Drawing a Weapon
Press or hold L2 or LT to draw the current character's weapon. A targeting display appears when a valid weapon and target are available.
Drawing a weapon does not automatically fire it. Use the targeting indicator to confirm:
- The intended guard or object is selected.
- The target is within range.
- No obstruction blocks the shot.
- The resulting noise or body position will be manageable.
Put the Weapon Away When the Opportunity Passes
Cancel the aim rather than holding the character in place while patrols continue moving.
Firing a Weapon
Press R2 or RT after drawing and aiming the weapon. The exact effect depends on the selected character.
A shot should always be part of a larger plan. Before firing, decide:
- Who will investigate the sound.
- Where the target will fall or move.
- Which character moves next.
- Whether the weapon has limited ammunition.
- How the shooter will remain hidden.
Range Matters
The aiming interface indicates whether the selected target can be reached. Move closer under cover rather than repeatedly trying to fire from outside the valid area.
A Weapon Is Not a General Combat Solution
Eriksholm is designed around avoiding detection. Firing at the wrong moment can alert another guard even when the original target is successfully neutralised.
Hanna's Controls and Abilities
Hanna is the first playable character and specialises in narrow routes and ranged incapacitation.
Her key advantages include:
- Moving through vents and other tight openings.
- Using a blowpipe or dart weapon against valid targets.
- Reaching routes that larger companions cannot enter.
- Operating effectively from concealed positions.
Using Hanna's Blowpipe
Hold L2 or LT to draw and aim the blowpipe, position the target and press R2 or RT to fire.
Before using a dart:
- Confirm the guard is within range.
- Check whether another patrol can see the body.
- Identify the route Hanna will use immediately afterward.
- Make sure the dart is required rather than merely convenient.
Use Vents to Bypass Sightlines
A vent is not only a shortcut. It can move Hanna behind a locked area, around a patrol or into position for a dart shot that is impossible from the main route.
Check Where the Vent Ends
Detach the camera and inspect the destination whenever possible. The exit may be watched even when the entrance is safe.
Alva's Controls and Abilities
Alva brings vertical mobility and environmental distraction tools. Her routes frequently run above or beside the paths used by the other characters.
Her advantages include:
- Climbing drainpipes and compatible vertical routes.
- Using a slingshot.
- Breaking lights to create darkness.
- Producing distractions at selected environmental targets.
- Reaching useful rooftop positions.
Using Alva's Slingshot
Hold L2 or LT to aim the slingshot. Position the targeting marker over a valid light or object, then press R2 or RT.
Break Lights Before Moving the Team
Extinguishing a light can create a safer corridor for all three characters. Prepare the darkness first, then switch to the companion who must cross it.
Expect Guards to Investigate
A broken light may attract attention. Use that reaction as part of the solution rather than assuming the area will simply become empty and dark.
Use Height to Scout
Alva's climbing routes often provide excellent camera positions. Reach the rooftop, detach the camera and study the lower patrols before continuing.
Sebastian's Controls and Abilities
Sebastian specialises in routes and physical actions unavailable to Hanna and Alva.
His advantages include:
- Swimming through water routes.
- Crossing submerged or separated sections.
- Physically incapacitating valid guards from behind.
- Creating openings for less physically capable companions.
Using Sebastian's Takedown
Move quietly behind a valid guard and press the displayed interaction command when the takedown prompt appears.
Do not approach until:
- The target is facing away.
- No second guard can observe the position.
- The patrol will remain separated long enough.
- Sebastian has a safe route after the action.
Swimming Routes Are Often One Piece of the Solution
A water route may place Sebastian behind a locked gate or patrol, allowing him to open a path or remove an obstacle for the others.
Do Not Assume Every Guard Can Be Choked Out Safely
The action may be mechanically available but tactically wrong. Check witnesses and patrol timing before committing.
Opening the Inventory
Press the Touch Pad on PlayStation 5 or View on Xbox to open the inventory.
Use the inventory to review available items, ammunition and relevant collected objects. Check it before entering a complicated encounter so you know what each active character can actually use.
Do Not Discover an Empty Weapon at the Critical Moment
Review Hanna's darts and other limited resources before designing a route around them.
Pause Menu
Press Options or Menu to pause the game. The pause screen provides access to settings, controls and other available menu functions.
Use the pause menu when:
- You need to review the controls.
- The camera or aiming sensitivity feels uncomfortable.
- You want to adjust subtitle or accessibility options.
- You need a moment to reconsider a multi-character sequence.
Controller Remapping
Control customisation can vary by platform and game version. Open the Controls section to confirm which actions can be reassigned on your current system.
When remapping, keep these commands easy to reach:
- Character selection.
- Interact and Cancel.
- Attach Camera.
- Draw Weapon and Fire Weapon.
- Run.
Keep Aim and Fire on Separate Inputs
The two-stage weapon system allows you to inspect the target before spending ammunition or making noise.
Keep Character Switching Accessible
Later encounters require rapid movement between Hanna, Alva and Sebastian. Avoid a layout that makes character selection awkward.
Recommended Camera Settings
Camera Rotation Sensitivity
Use a speed that allows you to inspect behind buildings without overshooting narrow lanes or small targets.
Zoom Preference
Keep the camera zoomed out during planning and move closer for weapon aiming or cramped interiors.
Controller Vibration
Vibration can provide feedback for interactions and weapon use. Reduce it if it becomes distracting during precise stealth timing.
Subtitles
Enable subtitles to follow overheard conversations and story dialogue while moving the camera around the environment.
Frequently Asked Questions
What are the default Eriksholm PS5 controls?
The left stick moves, the right stick rotates the camera, R1 runs, L1 attaches the camera, L2 draws a weapon, R2 fires, Cross interacts, Circle cancels, Triangle zooms in and Square zooms out.
How do you run?
Hold R1 on PlayStation or RB on Xbox while moving.
How do you switch characters?
Use the D-Pad direction assigned to the desired available character.
How do you rotate the camera?
Use the right stick or the active PC camera controls.
How do you zoom in?
Press Triangle on PlayStation or Y on Xbox.
How do you zoom out?
Press Square on PlayStation or X on Xbox.
How do you centre the camera on a character?
Press L1 or LB to attach or recenter the camera on the active character.
How do you detach the camera?
Use L1 or LB together with the displayed camera movement input shown by the control interface.
How do you interact?
Press Cross or A when a contextual prompt appears.
How do you cancel an interaction?
Press Circle on PlayStation or B on Xbox.
How do you draw a weapon?
Use L2 or LT with a character who currently has a usable weapon.
How do you fire a weapon?
Aim with L2 or LT and press R2 or RT once the correct target is selected.
How does Hanna use her blowpipe?
Select Hanna, draw the weapon with L2 or LT, aim at a valid guard and press R2 or RT.
How does Alva break lights?
Select Alva, aim her slingshot with L2 or LT and fire at an in-range light with R2 or RT.
How does Sebastian incapacitate guards?
Approach a valid guard from behind and press the displayed contextual interaction input.
Which character can use vents?
Hanna can pass through narrow ventilation routes.
Which character can climb drainpipes?
Alva can use compatible drainpipes and vertical routes.
Which character can swim?
Sebastian can traverse water routes that the others cannot use.
How do you open the inventory?
Press the Touch Pad on PlayStation or View on Xbox.
Can you fight guards directly?
The game is designed around avoiding detection and using character-specific incapacitation tools. It does not use a conventional open-combat system.
Why does the game restart when I am seen?
Most encounters function as stealth puzzles. Detection represents a failed sequence and normally returns the player to a recent checkpoint.
Can the controls be remapped?
Available remapping depends on the platform and current version. Check the in-game Controls menu for supported options.
Does the PC version support a controller?
Yes. Compatible controllers can be used on PC.
What is the most important control to learn?
Character selection is the centre of the game. Most encounters are solved by placing the correct person in the correct position before using a weapon or interaction.
Final Control Advice
The controls in Eriksholm: The Stolen Dream are deliberately uncomplicated. The real skill lies in using them in the correct sequence: scout with the detached camera, position each character, switch with the D-Pad and perform the interaction only when every patrol is accounted for.
Use Hanna for vents and precise dart shots, Alva for vertical routes and environmental distractions, and Sebastian for swimming and close-range takedowns. Zoom out while planning, zoom in when aiming and remember that Circle or B can cancel an action when the timing changes.
Continue with our Eriksholm: The Stolen Dream Tips and Tricks Guide for character strategies, patrol timing, camera techniques, distractions, collectibles and multi-character puzzle advice.
Comments
No comments yet. Be the first to share your thoughts!