Metro Exodus uses more contextual controls than the average first person shooter. Artyom has ordinary movement and weapon commands, but you also need quick access to the gas mask, filters, medkits, flashlight charger, night vision goggles, binoculars, throwables and field inventory.
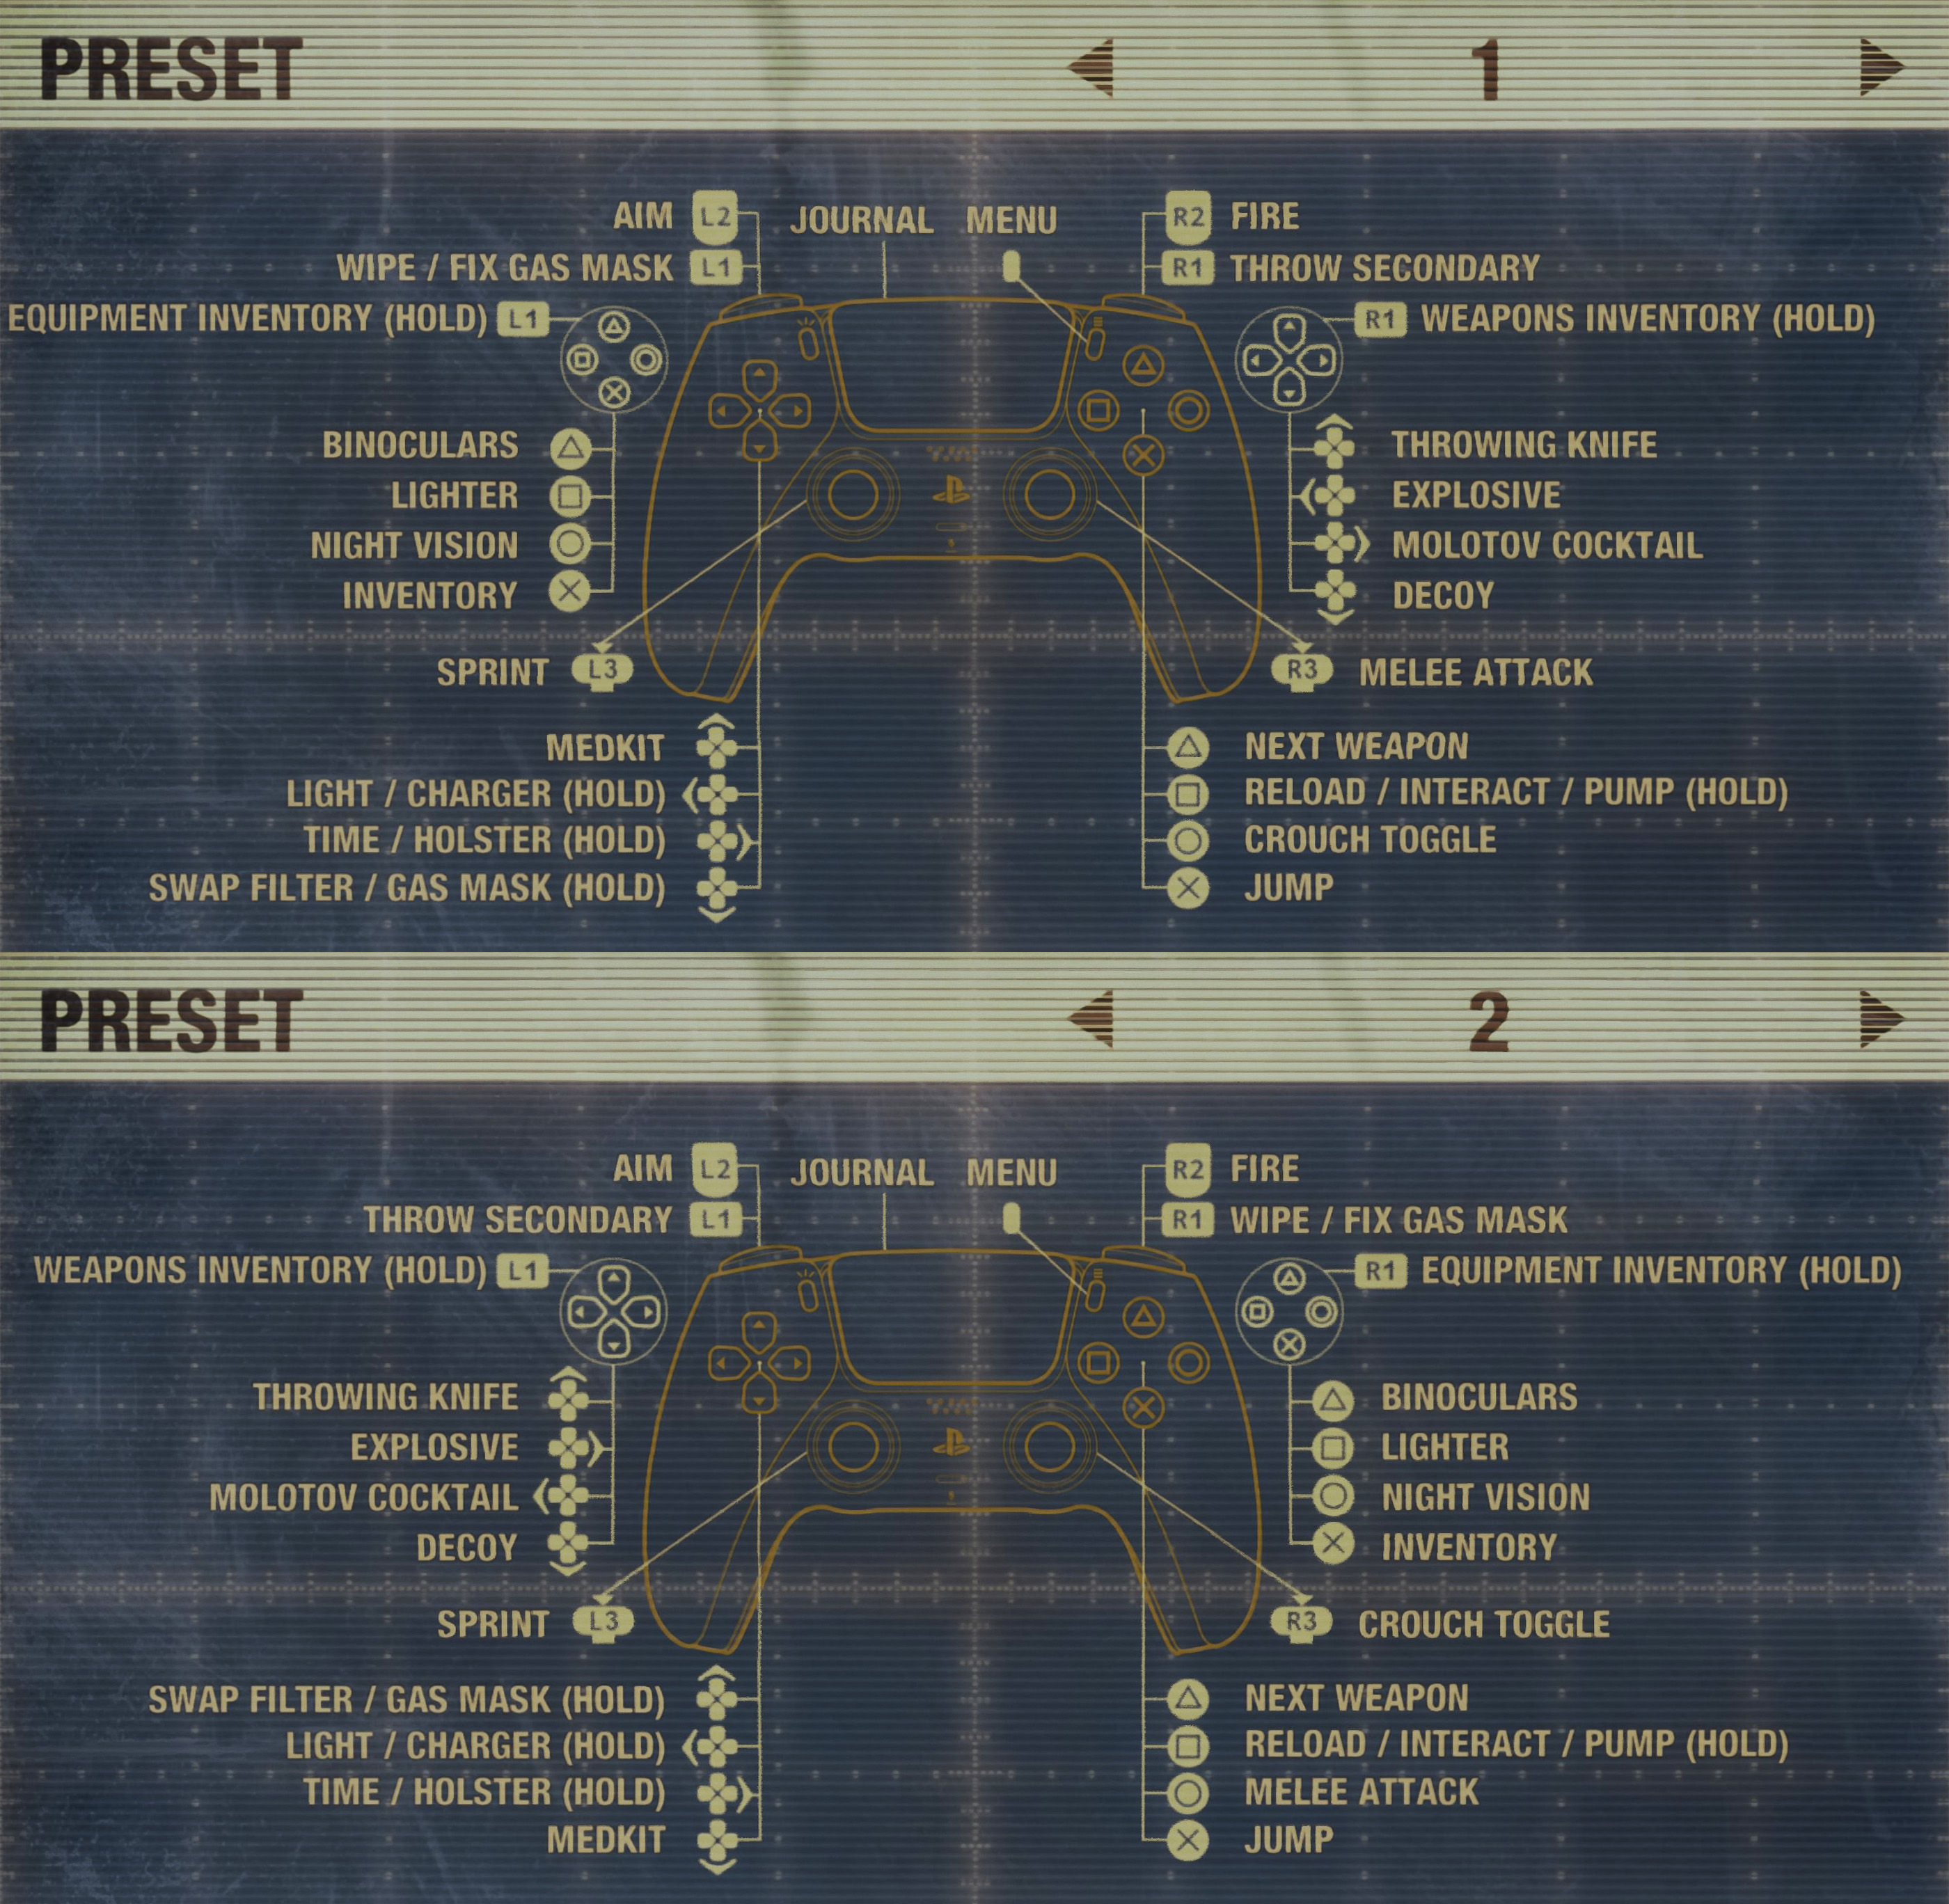
The default PlayStation controller menu offers two presets. Preset 1 keeps the equipment inventory on L1 and the weapons inventory on R1. Preset 2 reverses those shoulder button roles, which can feel more natural if you prefer your weapon controls grouped on the left side.
This guide focuses on Preset 1 shown in the in game controller screen, with Xbox equivalents and the most useful PC keyboard controls included below.
Metro Exodus Basic Controls
| Action | PlayStation | Xbox |
|---|---|---|
| Move | Left Stick | Left Stick |
| Look / Aim | Right Stick | Right Stick |
| Sprint | Press L3 | Press Left Stick |
| Aim Weapon | Hold L2 | Hold LT |
| Fire | R2 | RT |
| Melee Attack | Press R3 | Press Right Stick |
| Next Weapon | Triangle | Y |
| Reload / Interact | Square | X |
| Pump Pneumatic Weapon | Hold Square | Hold X |
| Crouch Toggle | Circle | B |
| Jump | Cross | A |
| Journal | Touch Pad | View Button |
| Pause Menu | Options | Menu Button |
Aiming and Shooting
Hold L2 or LT to aim and press R2 or RT to fire. Metro Exodus rewards accurate, deliberate shooting because ammunition and crafting materials are limited compared with many action shooters.
Aim for Vulnerable Areas
Human enemies are often best handled with carefully placed shots instead of long automatic bursts. Against mutants, learn which weapons can stop an approaching creature quickly enough to justify the ammunition cost.
Do Not Fire Simply because an Enemy Exists
Many encounters can be avoided or approached quietly. Saving ammunition gives you more flexibility when stealth stops being an option.
Reloading and Pneumatic Weapons
Press Square or X to reload. The same button is contextual and can also interact with objects.
When using a pneumatic weapon that requires pressure, hold Square or X to operate its pump when the command is available.
Maintain Pressure before Combat
Do not wait until a creature is charging toward you before discovering that your pneumatic weapon needs attention. Check it while the area is calm.
Equipment Inventory Controls
Preset 1 uses L1 or LB for equipment. Tap the shoulder button to wipe or repair the gas mask when appropriate, or hold it to access the equipment inventory.
| Equipment Action | PlayStation Preset 1 | Xbox Preset 1 |
|---|---|---|
| Wipe / Fix Gas Mask | L1 | LB |
| Open Equipment Inventory | Hold L1 | Hold LB |
| Binoculars | Hold L1 + Triangle | Hold LB + Y |
| Lighter | Hold L1 + Square | Hold LB + X |
| Night Vision | Hold L1 + Circle | Hold LB + B |
| Inventory / Backpack | Hold L1 + Cross | Hold LB + A |
| Medkit | Hold L1 + D Pad Up | Hold LB + D Pad Up |
| Light / Charger | Hold L1 + D Pad Left | Hold LB + D Pad Left |
| Time / Holster | Hold L1 + D Pad Right | Hold LB + D Pad Right |
| Swap Filter / Gas Mask | Hold L1 + D Pad Down | Hold LB + D Pad Down |
Some equipment is obtained during progression, so an input may not perform its listed function until the corresponding item has been acquired.
Gas Mask Controls
Your gas mask becomes essential in contaminated areas. With Preset 1, L1 or LB handles wiping and temporary repairs, while the equipment menu gives access to mask and filter management.
Wipe the Mask when Visibility Gets Bad
Mud, moisture and blood can obscure the visor. Cleaning it takes very little time and can make dark or dangerous areas much easier to read.
Watch Your Filter Time
Artyom's watch gives you important information about remaining filter time. Do not replace a filter simply because you entered a contaminated area. Replace it when the current one is running out.
Repair Cracks Quickly
If the mask becomes damaged, use the repair command instead of continuing until the situation becomes critical.
Flashlight and Charger Controls
Open the equipment inventory and use the Light / Charger command to manage your electrical light source. Holding the relevant input allows Artyom to recharge equipment using the manual charger.
Recharge before Entering Darkness
A quiet room or safe corner is a better place to charge equipment than a mutant filled tunnel.
Turn Lights Off during Stealth
Visibility works both ways. Darkness can be useful when you are trying to pass human guards unnoticed.
Night Vision Controls
After acquiring night vision equipment, access it through the equipment inventory. On Preset 1 this is L1 plus Circle on PlayStation or LB plus B on Xbox.
Night vision is extremely useful in dark interiors where a flashlight would reveal your position.
Binocular Controls
Hold L1 and press Triangle on PlayStation with Preset 1 to use binoculars. On Xbox, hold LB and press Y.
Binoculars are more useful than they first appear because surveying the landscape can reveal places worth investigating.
Scan from High Ground
Whenever you reach a clear overlook, slowly inspect buildings, towers and unusual landmarks before continuing.
Scout before Walking into a Camp
A few seconds of observation can show you patrols, entrances and possible routes that are difficult to notice once combat begins.
Weapons Inventory and Throwables
Preset 1 places the weapons inventory on R1 or RB. Tap R1 to throw the currently selected secondary item, or hold it to access weapon and throwable selections.
| Weapon Action | PlayStation Preset 1 | Xbox Preset 1 |
|---|---|---|
| Throw Secondary | R1 | RB |
| Open Weapons Inventory | Hold R1 | Hold RB |
| Throwing Knife | Hold R1 + D Pad Up | Hold RB + D Pad Up |
| Explosive | Hold R1 + D Pad Left | Hold RB + D Pad Left |
| Molotov Cocktail | Hold R1 + D Pad Right | Hold RB + D Pad Right |
| Decoy | Hold R1 + D Pad Down | Hold RB + D Pad Down |
Throwing Knives Are Worth Recovering
A throwing knife can provide a quiet takedown without spending firearm ammunition. Look around the target afterward because a recovered knife can be used again.
Use Decoys before Explosives
A distraction can solve a stealth problem without turning the entire area hostile. Keep explosives for situations where subtlety no longer helps.
How Preset 2 Changes the Controls
Preset 2 primarily swaps the shoulder button roles. L1 becomes Throw Secondary and Weapons Inventory, while R1 becomes Wipe / Fix Gas Mask and Equipment Inventory.
This also changes which shoulder button you hold before selecting throwables or equipment shortcuts.
| Function | Preset 1 | Preset 2 |
|---|---|---|
| Equipment Inventory | Hold L1 | Hold R1 |
| Wipe / Fix Gas Mask | L1 | R1 |
| Weapons Inventory | Hold R1 | Hold L1 |
| Throw Secondary | R1 | L1 |
Neither preset is inherently better. Use whichever makes equipment and throwable management easier to remember.
Crouching and Stealth Controls
Press Circle or B to toggle crouch.
Move Slowly around Human Enemies
Crouching reduces your profile, but light and noise remain important. Use shadows, turn off nearby lamps where possible and avoid rushing across noisy surfaces.
Watch the Wrist Indicator
Artyom's equipment provides useful feedback about whether he is exposed. Learn to read the game's physical indicators rather than expecting a large stealth meter in the middle of the screen.
Journal and Map
Press the Touch Pad on PlayStation to access Artyom's journal and map interface. Xbox uses the corresponding View button.
Metro Exodus does not constantly lead you with an intrusive minimap. Check your map when you lose your bearings, then return your attention to the world.
Explore beyond the Main Route
Points of interest can contain weapon attachments, equipment upgrades, crafting resources and narrative discoveries.
PC Keyboard and Mouse Controls
| Action | Default PC Input |
|---|---|
| Move | W, A, S, D |
| Jump | Space |
| Sprint | Left Shift |
| Crouch | Ctrl |
| Crouch Toggle | C |
| Fire | Left Mouse Button |
| Aim | Right Mouse Button |
| Reload | R |
| Melee Attack | V |
| Throw Secondary | X |
| Gas Mask | G |
| Swap Filter | T |
| Light / Charger | F |
| Lighter | L |
| Night Vision | N |
| Binoculars | B |
| Medkit | Q |
| Backpack | Hold I |
| Journal | M |
| Time | Y |
PC bindings can be changed, so check the Controls menu if your setup differs from the defaults.
Frequently Asked Questions
How do you aim and shoot in Metro Exodus?
Hold L2 or LT to aim and use R2 or RT to fire.
How do you reload?
Press Square on PlayStation or X on Xbox.
How do you melee?
Press R3 or the Right Stick.
How do you crouch?
Press Circle or B to toggle crouching.
How do you sprint?
Press L3 or the Left Stick while moving.
How do you use a medkit?
With Preset 1, hold L1 or LB and use the Medkit shortcut on the D Pad.
How do you use binoculars?
With Preset 1, hold L1 and press Triangle on PlayStation or hold LB and press Y on Xbox.
How do you use night vision?
With Preset 1, hold L1 and press Circle on PlayStation or hold LB and press B on Xbox once night vision has been obtained.
How do you select a throwing knife?
With Preset 1, hold R1 or RB and use the throwing knife direction on the D Pad.
What is the difference between Preset 1 and Preset 2?
Preset 2 swaps the equipment and weapon inventory shoulder button roles, placing weapons on L1 and equipment on R1.
Learn the Survival Controls before You Need Them
Aim, fire and reload are only half of Metro Exodus. The commands that save you when things go wrong are the gas mask, filter change, medkit, flashlight charger and throwable shortcuts.
Spend a minute learning the equipment inventory before entering a dangerous area. When Artyom is choking, the flashlight is dying and something is moving in the darkness, searching the controller diagram is already too late.
See our Metro Exodus Tips and Tricks Guide for stealth, crafting, exploration, weapon maintenance, gas mask management and survival advice.
Comments
No comments yet. Be the first to share your thoughts!