Kingdom Come: Deliverance II uses a contextual control system built around directional combat, realistic archery, horse riding, conversations and everyday interactions. Henry does not control like a typical action RPG hero. Combat asks you to watch an opponent's weapon, choose an attack direction and manage stamina, while exploration gives the same buttons different jobs depending on whether you are walking, riding or talking.
The default PlayStation layout puts attack on R2, blocking and bow preparation on L2, combat locking on R3 and most world interactions on Cross. The D Pad gives quick access to the map, weapons, consumables, inventory, torch and helmet visor.
This guide covers the default PlayStation controls shown in the in game controls screen, the matching Xbox buttons and the most useful default PC keyboard commands.
Kingdom Come Deliverance II Controller Controls
| Action | PlayStation | Xbox |
|---|---|---|
| Move | Left Stick | Left Stick |
| Camera | Right Stick | Right Stick |
| Choose Attack Direction | Right Stick | Right Stick |
| Sprint | Press L3 | Press Left Stick |
| Spur Horse | Press L3 | Press Left Stick |
| Crouch | Press R3 | Press Right Stick |
| Hard Lock in Combat | Press R3 | Press Right Stick |
| Attack | R2 | RT |
| Block | L2 | LT |
| Unlock during Combat | R1 | RB |
| Quick Reply | L1 | LB |
| Jump | Circle | B |
| Use / Talk / Pick Up | Cross | A |
| Draw / Holster Weapon | Square | X |
| Call Horse | Triangle | Y |
| Dismount | Triangle | Y |
| Call Dog | Hold Triangle | Hold Y |
| Pause Menu | Options | Menu Button |
| Skip Time | Touch Pad | View Button |
Map, Inventory and Quick Slot Controls
| Action | PlayStation | Xbox |
|---|---|---|
| Open Map | D Pad Up | D Pad Up |
| Helmet Visor | Hold D Pad Up | Hold D Pad Up |
| Quick Weapons | D Pad Left | D Pad Left |
| Quick Consumables | D Pad Right | D Pad Right |
| Inventory | D Pad Down | D Pad Down |
| Torch | Hold D Pad Down | Hold D Pad Down |
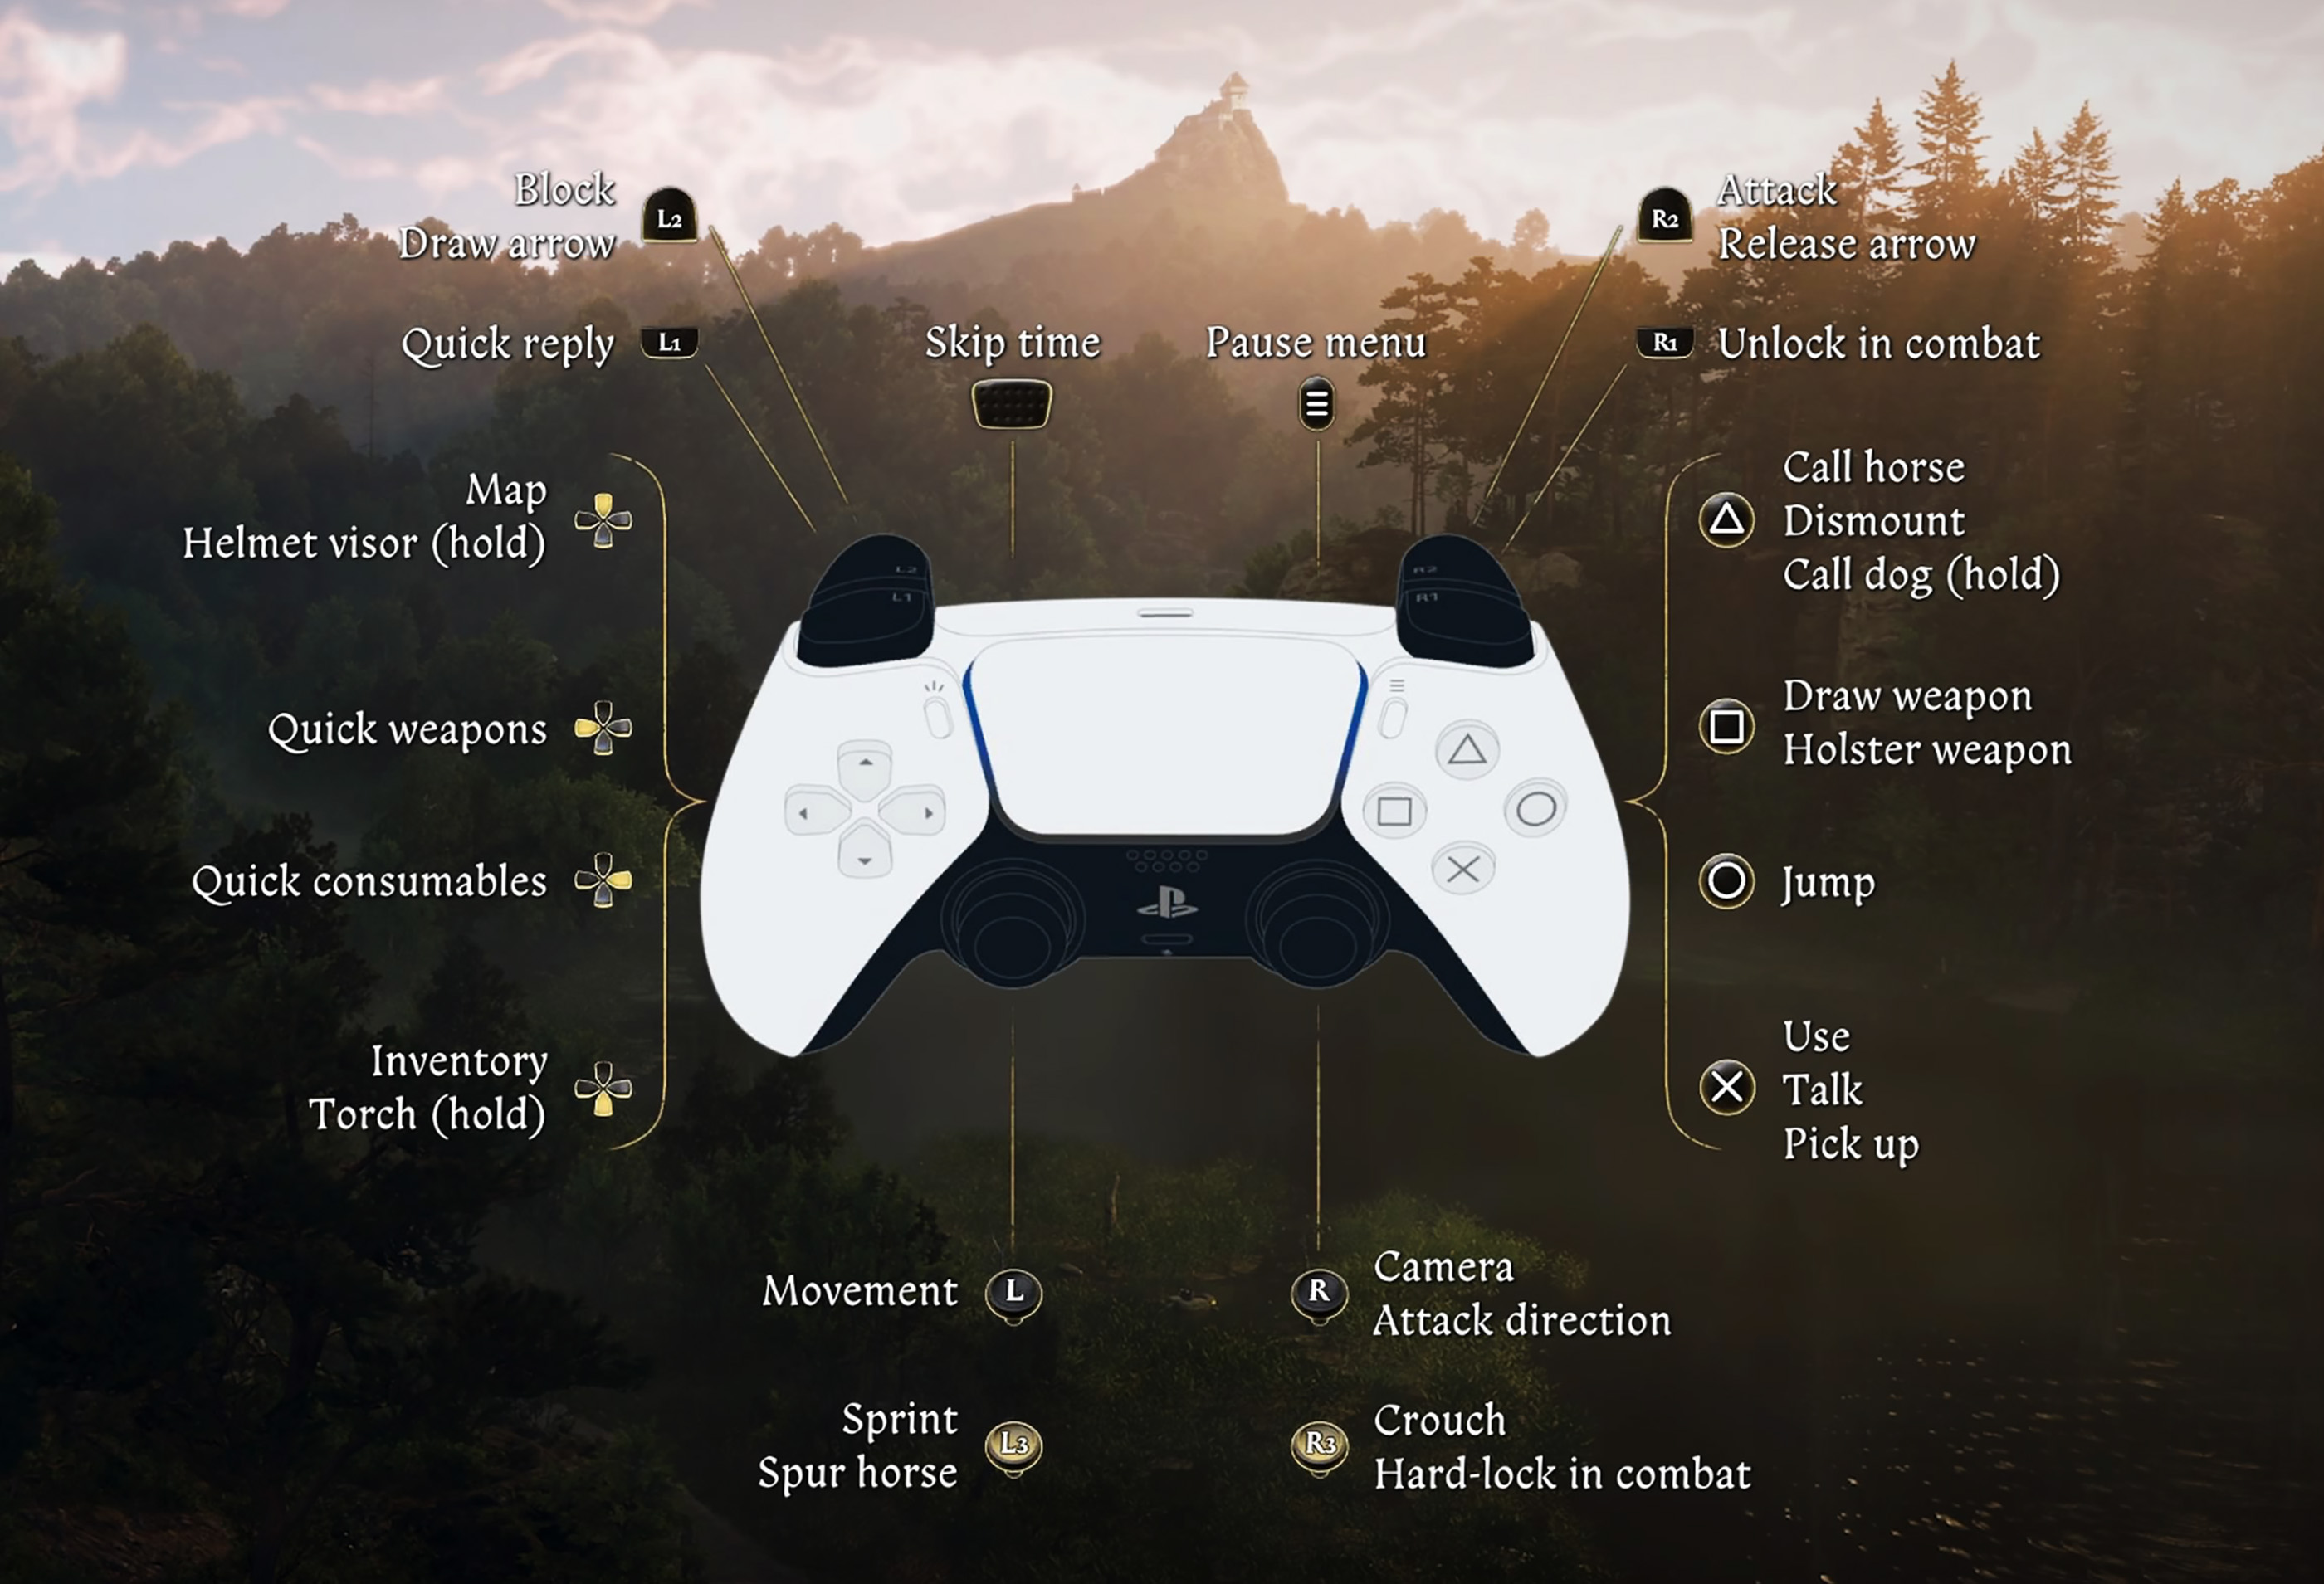
These shortcuts are worth memorising early. Opening the full inventory every time you need a weapon, potion or torch quickly becomes cumbersome, especially when travelling at night or entering combat unexpectedly.
How Combat Controls Work
Combat in Kingdom Come: Deliverance II is directional. The right stick is not only your camera control. During combat it also helps determine the direction of Henry's attack.
Press R2 or RT to attack and use the right stick to control the intended strike direction. L2 or LT blocks. R3 or the Right Stick button can hard lock onto an opponent, while R1 or RB releases the combat lock when you need more freedom.
Do Not Treat R2 Like a Combo Button
Repeated attacks can empty Henry's stamina and make his movements predictable. Watch the opponent, choose the opening and attack when you have enough stamina to defend afterward.
Use Attack Direction Deliberately
Move the right stick according to where you want the strike to come from. Changing your attack direction makes you less predictable than repeating the same angle.
Block before You Panic
L2 or LT should become one of your most familiar combat inputs. A measured defensive response is usually safer than repeatedly attacking an opponent who already has the initiative.
Hard Lock and Unlock Controls
Press R3 or the Right Stick button to hard lock during combat. This keeps your attention focused on the selected opponent and makes directional swordplay easier to manage.
Press R1 or RB to unlock when you need to disengage or reposition.
Hard Lock Works Best in Duels
Against one opponent, locking on helps you watch guard changes and attack animations.
Unlock When Several Enemies Surround You
A hard lock can become restrictive when another attacker is moving around your side. Create space instead of staring at one enemy while another reaches your back.
Archery Controls
| Archery Action | PlayStation | Xbox |
|---|---|---|
| Prepare / Draw Arrow | L2 | LT |
| Release Arrow | R2 | RT |
| Aim | Right Stick | Right Stick |
| Move | Left Stick | Left Stick |
With a bow equipped, L2 or LT changes from the normal blocking function to drawing the arrow. R2 or RT releases the shot.
Do Not Hold a Draw Forever
Archery becomes much harder when Henry is tired. Line up the shot, draw when ready and release without wasting stamina.
Practice at Short Range First
Learn the bow's trajectory at manageable distances before trying to hit small targets across a field.
Drawing and Holstering Weapons
Press Square or X to draw or holster Henry's current weapon.
Use D Pad Left to access quick weapons when you need to change what Henry has prepared.
Holster before Talking
Walking up to peaceful characters with a weapon in hand is rarely the most natural way to begin a conversation. Put the weapon away when the danger has passed.
Choose the Weapon before the Fight
If you expect armored opponents, prepare suitable equipment before combat begins rather than trying to reorganise Henry's loadout while under attack.
Interaction Controls
Cross or A is the main contextual interaction button. It can be used to talk, pick up objects, operate usable objects and confirm many actions in the world.
Pay attention to the prompt shown near the object or character because the same button changes function according to context.
Sprinting and Crouching
Press L3 or the Left Stick to sprint. Press R3 or the Right Stick button while outside combat to crouch.
Save Stamina before Trouble
Do not arrive at a dangerous encounter completely exhausted because you sprinted the entire way there. Henry needs stamina for fighting too.
Crouch before Entering a Restricted Area
Crouching lowers Henry's profile, but clothing, light and noise still matter. Stealth is more than pressing one button.
Horse Controls
| Horse Action | PlayStation | Xbox |
|---|---|---|
| Steer | Left Stick | Left Stick |
| Look Around | Right Stick | Right Stick |
| Spur Horse | Press L3 | Press Left Stick |
| Call Horse | Triangle | Y |
| Dismount | Triangle | Y |
Do Not Exhaust Your Horse Needlessly
Use extra speed when you actually need it. Leaving some stamina available gives you more options if a peaceful journey suddenly turns into an ambush.
Use the Horse for More Than Travel
A horse is valuable for movement and carrying capacity, making it especially helpful when Henry has accumulated heavy armor, weapons and other loot.
How to Use the Torch
Hold D Pad Down to equip or put away Henry's torch when one is available in the correct equipment slot.
A torch is especially useful while travelling through settlements at night. It also makes dark interiors considerably easier to navigate.
How to Open or Close the Helmet Visor
Hold D Pad Up to control the visor on helmets that support the feature.
Closing a visor provides the intended face protection but restricts Henry's vision. Open it when you are travelling or searching and close it when protection matters more than visibility.
Quick Weapons and Consumables
Press D Pad Left for quick weapons and D Pad Right for quick consumables.
Prepare the Slots before Leaving Town
Put the equipment you actually expect to use into convenient positions before beginning a long journey.
Keep Emergency Consumables Accessible
Anything you may need quickly is far more useful in a quick slot than buried inside the inventory.
PC Keyboard and Mouse Controls
| Action | Default PC Input |
|---|---|
| Move | W, A, S, D |
| Use / Talk | E |
| Jump | Space |
| Sprint | Left Shift |
| Crouch | C |
| Attack | Left Mouse Button |
| Block | Right Mouse Button |
| Hard Lock | Tab |
| Combat Free Lock | Middle Mouse Button |
| Quick Reply | Q |
| Map | M |
| Inventory | I |
| Torch | R |
| Helmet Visor | Z |
| Skip Time / Help | T |
| Pause | Esc |
| Weapon Slots | 1 to 4 |
| Consumable Slots | 5 to 8 |
PC has additional direct shortcuts for journal, player information, codex, crafting and other menus, which makes keyboard navigation somewhat different from the compact controller shortcut system.
Controller Settings Worth Checking
The Controls menu includes separate vertical and horizontal look sensitivity settings, stick dead zone adjustment, vibration, adaptive triggers and camera axis inversion options.
Adjust Dead Zone if the Camera Drifts
If Henry or the camera moves slightly when you are not touching a stick, increasing the dead zone can help compensate for controller drift.
Change Sensitivity before Combat Feels Wrong
Directional combat relies heavily on the right stick. A sensitivity setting that feels comfortable while exploring may also make attack direction easier to control.
Adaptive Triggers Are Optional
On PS5, adaptive trigger effects can be switched off if you prefer a lighter trigger response during long combat sessions.
Frequently Asked Questions
How do you attack in Kingdom Come Deliverance II?
Press R2 on PlayStation or RT on Xbox. Use the right stick to control attack direction.
How do you block?
Use L2 on PlayStation or LT on Xbox.
How do you lock onto an enemy?
Press R3 or the Right Stick button during combat.
How do you unlock from an enemy?
Press R1 or RB.
How do you jump?
Press Circle on PlayStation or B on Xbox.
How do you sprint?
Press L3 or the Left Stick while moving.
How do you crouch?
Press R3 or the Right Stick button outside combat.
How do you draw a weapon?
Press Square on PlayStation or X on Xbox.
How do you call your horse?
Press Triangle or Y.
How do you call your dog?
Hold Triangle or Y when the companion command is available.
How do you equip a torch?
Hold D Pad Down.
How do you open the helmet visor?
Hold D Pad Up while wearing a helmet with a movable visor.
How do you open the map?
Press D Pad Up.
How do you open the inventory?
Press D Pad Down.
Get the Core Inputs into Muscle Memory
The controls that matter most during your first hours are R2 or RT for attacking, L2 or LT for blocking, R3 for combat locking, Square or X for drawing a weapon and Cross or A for interacting.
After those feel natural, learn the D Pad shortcuts. Being able to reach the map, inventory, torch, visor, weapons and consumables without searching through menus makes travelling through Bohemia much smoother.
See our Kingdom Come Deliverance II Tips and Tricks Guide for combat, saving, money, horses, reputation, equipment and exploration advice.
Comments
No comments yet. Be the first to share your thoughts!