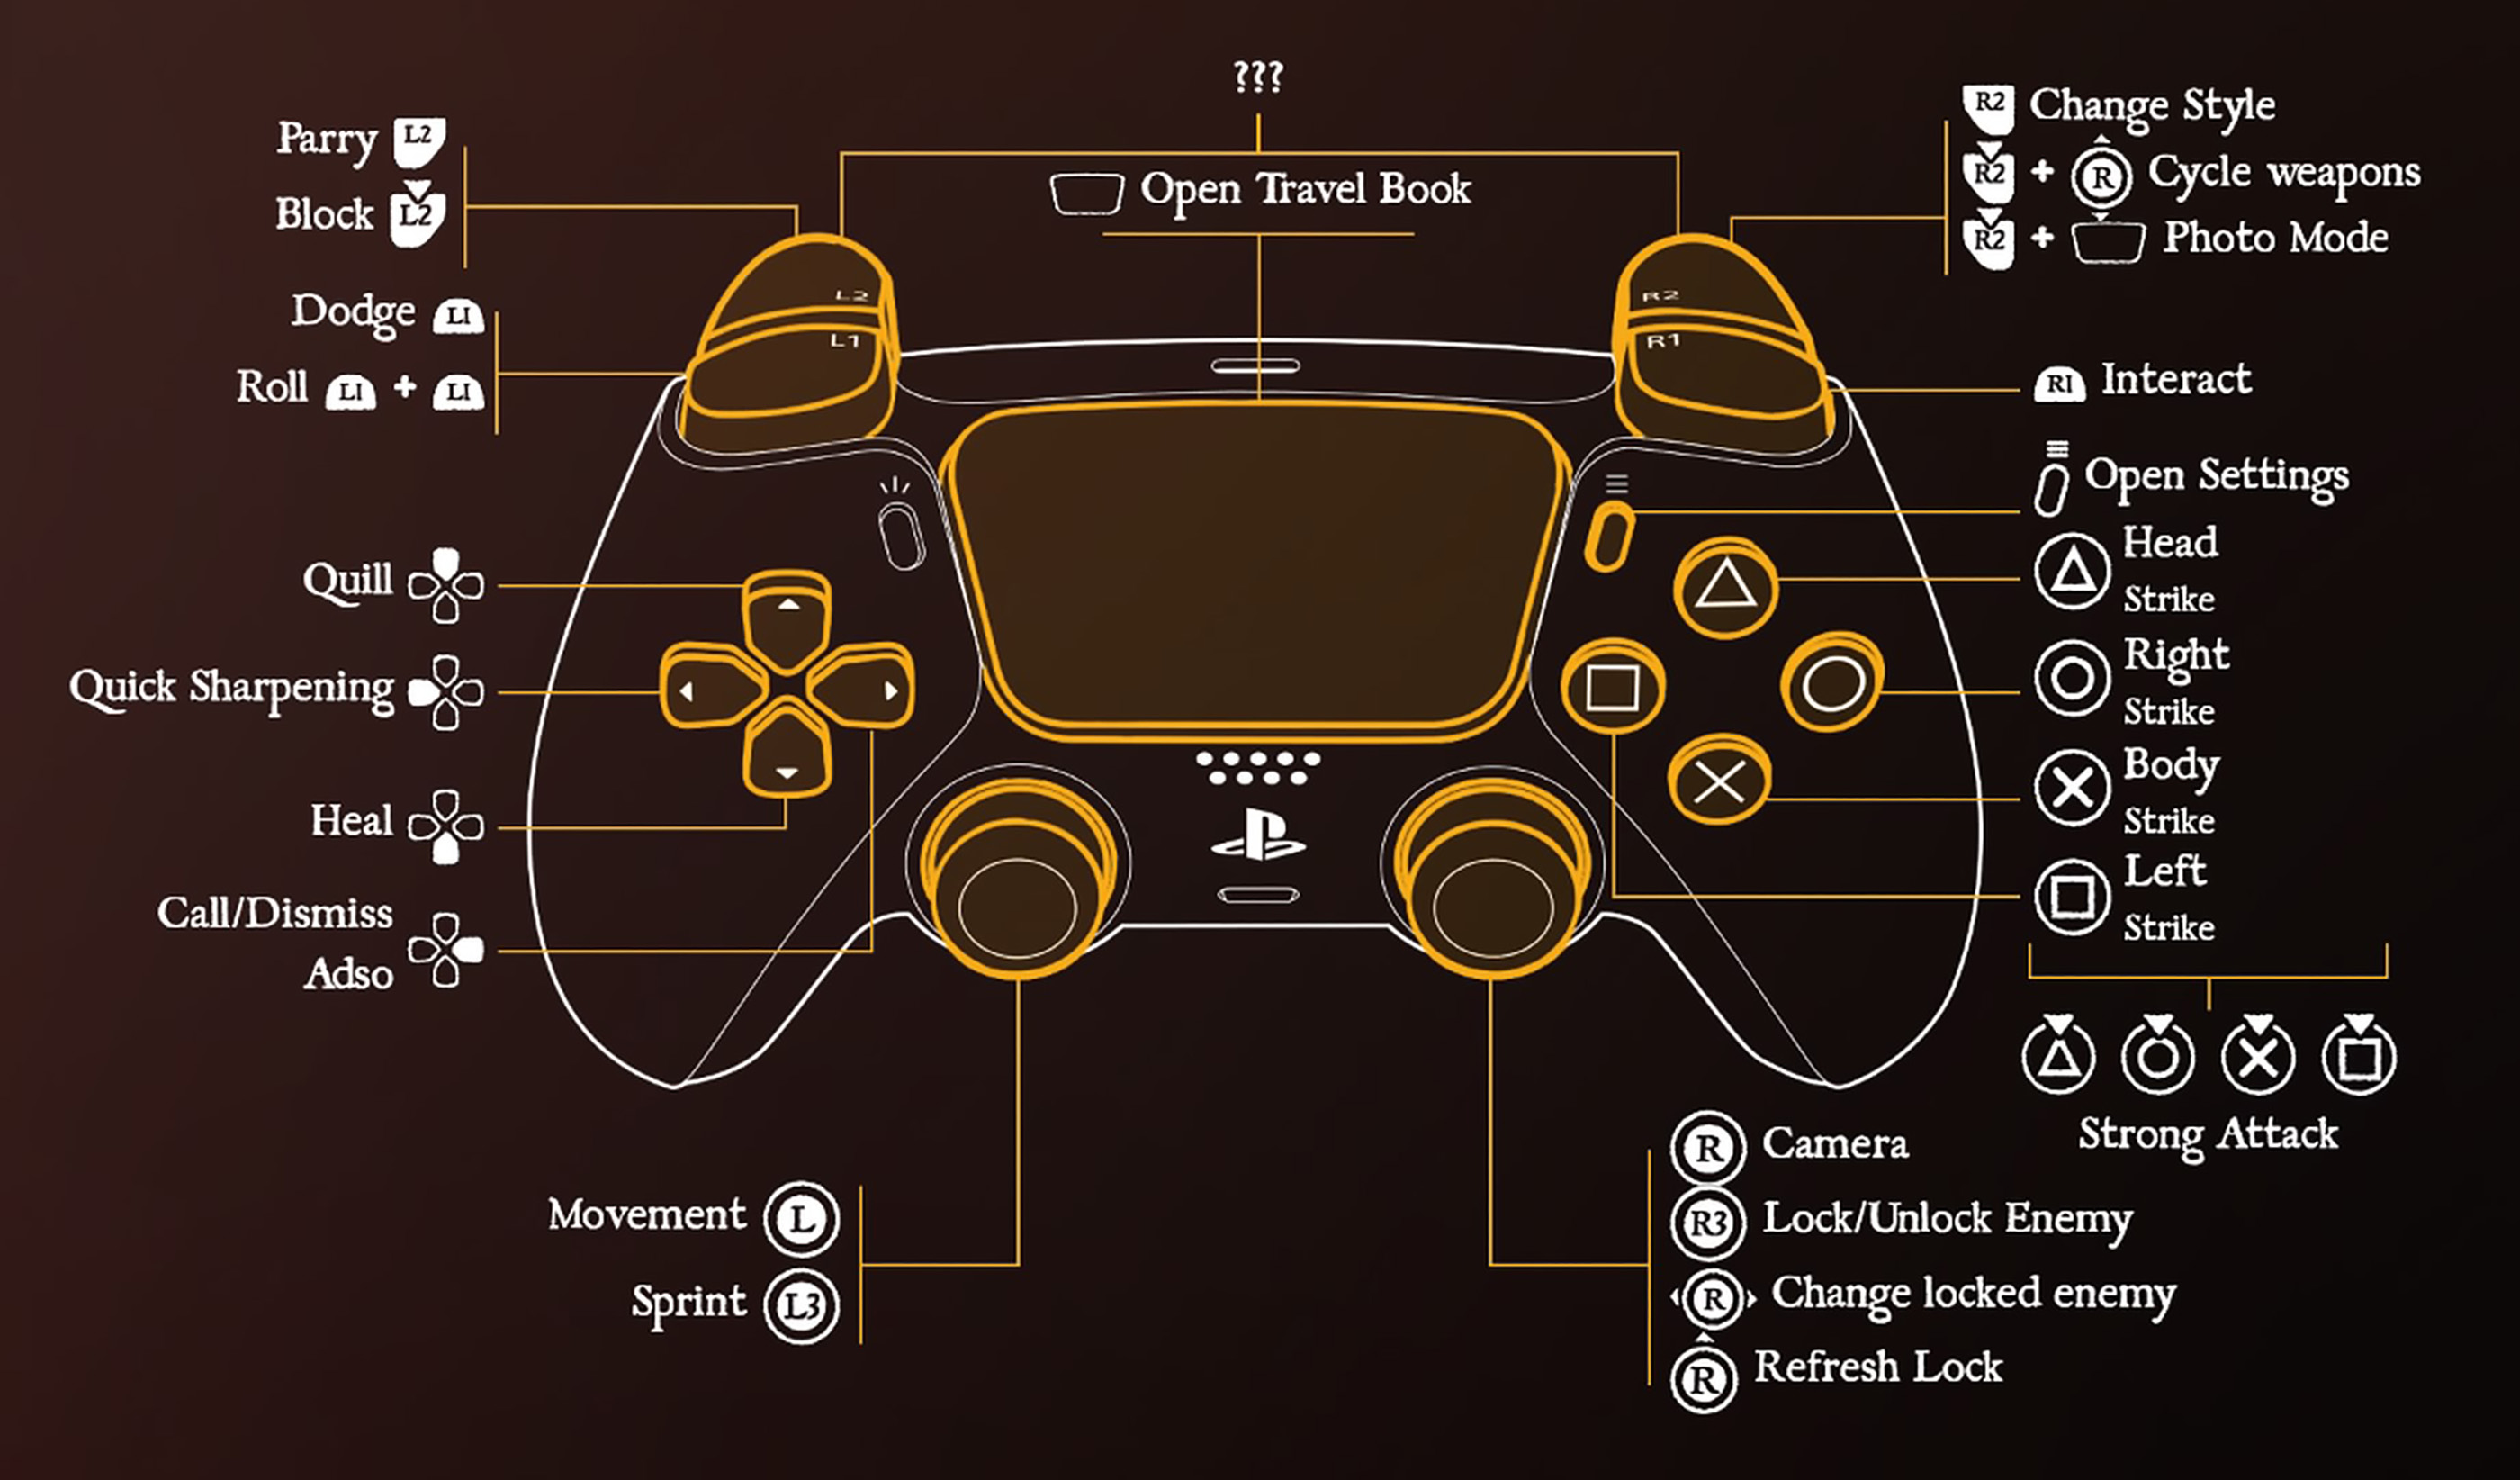
Blades of Fire uses an unusual directional combat system in which the four face buttons target separate parts of an enemy. Triangle attacks the head, X strikes the body, Square attacks from the left and Circle attacks from the right. Holding R2 while pressing one of those buttons turns the selected directional strike into a Strong Attack.
This layout matters because enemies do not have one universal defence value. A helmet may resist the weapon in Aran's hands while an exposed flank remains vulnerable. The game displays coloured outlines to show whether the selected weapon, combat style and target area are effective, encouraging you to change direction or equipment instead of repeatedly attacking the same armour.
Defence is similarly deliberate. Aran can block, parry, dodge or roll, but each response has a different purpose. Blocking helps recover stamina, parrying creates an aggressive counter window, dodging preserves close range and rolling escapes larger areas of danger.
Blades of Fire Controls
| Action | PlayStation 5 | Xbox Series | PC |
|---|---|---|---|
| Move | Left Stick | Left Stick | W / A / S / D |
| Sprint | Press L3 | Press Left Stick | Assigned Sprint Key |
| Move Camera | Right Stick | Right Stick | Mouse |
| Lock / Unlock Enemy | Press R3 | Press Right Stick | Assigned Lock-On Key |
| Change Locked Enemy | Move Right Stick while locked | Move Right Stick while locked | Mouse / Assigned Target Keys |
| Refresh Lock | Move Right Stick toward target | Move Right Stick toward target | Assigned Lock Input |
| Head Strike | Triangle | Y | Assigned Head Strike Key |
| Body Strike | X | A | Assigned Body Strike Key |
| Left Strike | Square | X | Assigned Left Strike Key |
| Right Strike | Circle | B | Assigned Right Strike Key |
| Strong Head Attack | R2 + Triangle | RT + Y | Strong Modifier + Head Strike |
| Strong Body Attack | R2 + X | RT + A | Strong Modifier + Body Strike |
| Strong Left Attack | R2 + Square | RT + X | Strong Modifier + Left Strike |
| Strong Right Attack | R2 + Circle | RT + B | Strong Modifier + Right Strike |
| Change Combat Style | Tap R2 | Tap RT | Assigned Change Style Key |
| Open Weapon Selection | Hold R2 | Hold RT | Hold Assigned Change Style Key |
| Cycle / Select Weapon | Hold R2 + Right Stick | Hold RT + Right Stick | Weapon Selection Inputs |
| Block | Hold L2 | Hold LT | Assigned Block Key |
| Parry | Tap L2 near impact | Tap LT near impact | Tap Block near impact |
| Dodge | L1 | LB | Assigned Dodge Key |
| Roll | L1, then L1 | LB, then LB | Press Dodge twice |
| Interact | R1 | RB | Assigned Interact Key |
| Use Quill / Request Guidance | D-Pad Up | D-Pad Up | Assigned Quill Key |
| Quick Sharpening | D-Pad Left | D-Pad Left | Assigned Sharpen Key |
| Heal | D-Pad Down | D-Pad Down | Assigned Heal Key |
| Call / Dismiss Adso | D-Pad Right | D-Pad Right | Assigned Adso Key |
| Open Travel Book | Touch Pad | View | Assigned Travel Book Key |
| Open Photo Mode | R2 + Touch Pad | RT + View | Assigned Photo Mode Key |
| Open Settings / Pause | Options | Menu | Esc |
PC note: Blades of Fire Version 2.0 supports full keyboard-and-mouse remapping. Because PC players can replace every important combat input, consult the Controls menu for your current bindings rather than relying on one universal keyboard layout.
How Directional Combat Works
The face-button layout acts like a small diagram of the enemy:
- Triangle / Y: Target the head.
- X / A: Target the body.
- Square / Xbox X: Strike from the left.
- Circle / B: Strike from the right.
These are not merely four animations with the same function. Direction determines which piece of armour the weapon contacts, the angle of the swing, how much room the attack requires and whether the blow can reach an exposed area.
Lock onto an enemy before attacking and inspect the highlighted body areas. A weapon that performs badly against the head may work perfectly against the torso or an unprotected side.
Understanding Green, Yellow and Red Outlines
The coloured outline is one of the most important sources of combat information:
- Green: The selected weapon, style and target area are highly effective.
- Yellow: The attack can work, but its damage or penetration is reduced.
- Red: The attack is poorly suited to that armour and may bounce or inflict almost no meaningful damage.
Do not respond to a red outline by charging a stronger version of the same attack. Strong force does not automatically overcome the wrong damage type. Change body area, switch combat style or equip another weapon.
Fast Combat Check
Lock on, check all four target directions, tap R2 to test the alternate style, and switch weapons only if the useful areas remain yellow or red.
Regular Directional Strikes
Press a face button without the Strong Attack modifier to perform a standard directional strike. These attacks normally come out faster and recover sooner than Strong Attacks, making them safer for testing an unfamiliar opponent.
Use short sequences. Two accurate green strikes followed by defence are often more valuable than a long combination that drains stamina and leaves Aran unable to react.
Strong Attacks
Hold R2 or RT and press the desired directional button to perform a Strong Attack. For example, R2 plus Triangle creates a Strong Head Attack, while R2 plus Circle produces a Strong Right Attack.
Strong Attacks are slower and require greater commitment, but they provide increased impact when used against a suitable target. They are best employed after:
- A successful parry.
- An enemy's heavy attack misses.
- A target becomes staggered.
- A boss enters a confirmed recovery animation.
- Aran approaches an unaware opponent.
Do not hold R2 unnecessarily during normal combinations. A brief tap changes style, while holding it prepares the weapon-selection and Strong Attack layer. Mixing those inputs carelessly can produce a style change or menu action instead of the strike you intended.
Slashing, Piercing and Blunt Damage
Weapons can deliver three broad forms of physical damage. The correct type matters as much as the direction of attack.
Slashing
Slashing attacks use an edge to cut exposed flesh, cloth and suitable armour. They often provide broad arcs that are useful against lightly protected targets or groups.
Piercing
Piercing attacks concentrate force through a narrow point. They are effective against certain armour gaps and resistant surfaces that broad cuts cannot penetrate.
Blunt
Blunt attacks rely on impact rather than an edge. They are valuable against heavy armour, hard materials and enemies that resist slashing.
A target can be vulnerable in direction but resistant in material. When a seemingly exposed area still appears yellow or red, test another combat style or weapon type.
Changing Combat Style
Tap R2 or RT to change the current weapon's combat style. The alternate style can modify the stance, attack path and damage type without forcing you to equip a different weapon.
This is particularly useful when:
- A weapon supports both slashing and piercing.
- A broad swing is hitting a wall or doorway.
- An armoured target resists the current attack type.
- You need a faster or more focused moveset.
- The fight shifts from several weak enemies to one elite opponent.
After changing style, inspect the target outline again. A red head or torso can immediately become green when the new style uses a better damage type.
Switching Weapons
Hold R2 or RT and move the right stick toward the desired weapon. This allows Aran to carry several specialised tools rather than relying on one weapon for the entire journey.
A balanced equipped set should normally include:
- A fast weapon for common enemies.
- A piercing option for protected targets.
- A high-impact or blunt weapon for heavy armour.
- A durable reserve weapon for exploration and retrieval runs.
Do not preserve a weak weapon simply because it has a familiar moveset. At the same time, avoid wasting the durability of your finest specialist against every minor patrol.
Blocking
Hold L2 or LT to raise the equipped weapon defensively. Blocking is suitable against conventional attacks whose timing or strength you do not yet understand.
Weapon design affects defensive performance. A well-balanced, durable weapon may handle blocking more effectively than a lightweight blade built entirely around damage.
Breath of the Defender
Holding the block stance helps Aran restore stamina. This mechanic turns defence into part of the offensive rhythm rather than a passive emergency action.
After a short combination, step out of immediate reach and hold L2. Recover enough stamina for the next exchange instead of waiting until the bar is completely empty.
When Blocking Is the Wrong Choice
Dodging or rolling may be safer against:
- Very large enemies.
- Heavy attacks with extreme impact.
- Grabs or unusual unblockable actions.
- Explosions and broad areas of danger.
- Long multi-hit combinations that rapidly consume defence.
Parrying
Tap L2 or LT shortly before the enemy's strike connects. A successful parry interrupts the attacker, creates an offensive opening and temporarily removes ordinary stamina pressure from Aran's counterattack.
To learn the timing, block the move first. Watch the exact moment the weapon reaches Aran's guard, then press L2 closer to that impact on the next attempt.
React to the final part of the swing rather than the enemy raising its weapon. Many opponents deliberately pause or delay their attack to catch an early parry attempt.
Parry Counter Sequence
Before attempting the parry, note which body area is green. Once the parry succeeds, immediately use the prepared directional attack or its Strong version rather than spending the entire opening searching for a target.
Dodging
Press L1 or LB once to perform a short dodge. The dodge is intended for precise movement around narrow attacks while preserving close range.
Dodge sideways around forward strikes when possible. This often places Aran near an exposed flank and shortens the distance required for the counterattack.
Rolling
Press L1 or LB twice to perform a longer roll. Rolling sacrifices more position and time but escapes larger hitboxes and broad hazards more reliably.
Use a roll against giant creatures, explosions and attacks covering most of the space around Aran. Use a normal dodge when only a small correction is necessary.
Do Not Panic Roll
Repeated rolls can consume valuable stamina and carry Aran into a second enemy or environmental hazard. Wait until the dangerous part of the attack is actually approaching.
Locking Onto Enemies
Press R3 to lock onto a target. Lock-on keeps the opponent centred and makes directional armour information easier to read.
Move the right stick to change the selected enemy. When the current lock becomes unreliable, move the right stick toward the intended target to refresh it.
When to Use Lock-On
- One-on-one fights.
- Reading directional effectiveness.
- Preparing parries.
- Circling an elite enemy.
- Keeping a quick opponent in view.
When to Unlock
- Several enemies surround Aran.
- The camera is trapped beside scenery.
- A boss occupies most of the screen.
- You are retreating through a narrow route.
- A ranged attacker is outside the locked target's direction.
Stamina Management
Every exchange should end before Aran completely empties his stamina. A final unnecessary attack can leave him unable to block, dodge or punish the enemy's next opening.
A dependable rhythm is:
- Land two or three suitable strikes.
- Watch the enemy response.
- Block, parry or evade.
- Hold defence briefly to restore stamina.
- Begin the next exchange.
High-damage weapons are not automatically efficient if their stamina cost restricts Aran to one attack before every recovery period.
Quick Sharpening
Press or hold D-Pad Left to sharpen the equipped weapon in the field. Sharpening restores lost edge performance but permanently consumes part of the weapon's durability.
Do not sharpen simply because the sharpness indicator is no longer perfect. Wait until reduced edge quality causes a meaningful drop in damage or effectiveness.
Sharpness and Durability Are Different
Sharpness represents current cutting performance. Durability represents the weapon's remaining long-term life. Field sharpening improves the first by consuming the second.
A weapon repeatedly sharpened after minor wear may remain effective in the short term but lose valuable repair life much sooner.
Healing
Press D-Pad Down to heal. Begin only when the enemy has entered a real recovery animation or when terrain has created enough protection.
Distance by itself is not always safe. Several enemies can close large gaps quickly, so watch their current animation before committing to the heal.
Using the Quill
Press D-Pad Up to use the quill and request contextual guidance. It can help clarify the current objective or suggest where Adso's accumulated knowledge may be useful.
Use it after checking the immediate area but before wandering repeatedly through routes you have already cleared.
Calling and Dismissing Adso
Press D-Pad Right to call or dismiss Adso. He records observations, provides contextual dialogue and contributes information to the Travel Book.
When Adso mentions a new discovery, check the Travel Book. His notes may contain enemy weaknesses, environmental details or clues about the next step.
Opening the Travel Book
Press the Touch Pad on PlayStation or View on Xbox to open the Travel Book. It records maps, objectives, routes, discoveries and Adso's observations.
Treat it as a travel journal rather than a perfect GPS. Memorise anvils, bridges, lifts, doors and major landmarks so that returning to unfinished routes becomes easier.
Photo Mode
Hold R2 and press the Touch Pad to open Photo Mode on PlayStation. Xbox players use RT plus View. Version 2.0 added the mode alongside new progression and combat features.
Enter it only when the immediate area is safe. Returning from the photography interface does not necessarily protect Aran from an enemy that was already preparing an attack.
Camera Settings
The Controls menu allows adjustment of:
- X-axis sensitivity.
- Y-axis sensitivity.
- Camera acceleration.
- Camera deceleration.
- Inverted horizontal movement.
- Inverted vertical movement.
- Controller vibration.
Recommended Camera Setup
Use moderate sensitivity so you can follow flanking enemies without overshooting precise directional targets. Keep acceleration relatively controlled and use slightly stronger deceleration if the camera often continues past the enemy after you release the stick.
The values shown in the supplied settings image—22% horizontal and vertical sensitivity, 20% acceleration and 40% deceleration—provide a deliberate starting point, although the best result depends on your controller and preferences.
How to Remap PC Controls
- Open the pause menu.
- Select Settings.
- Open the Controls or input configuration section.
- Select the action you want to replace.
- Press the new keyboard or mouse input.
- Check for conflicts with the four directional attacks.
- Apply the changes.
- Test attacks, style switching, blocking and rolling in a safe area.
Version 2.0 supports full keyboard-and-mouse remapping. Prioritise a layout that lets you access all four directional strikes, the Strong Attack modifier, block and dodge without moving your hand excessively.
Frequently Asked Questions
What are the default PlayStation controls in Blades of Fire?
Triangle attacks the head, X attacks the body, Square attacks from the left and Circle attacks from the right. L2 blocks or parries, L1 dodges and rolls, R2 changes style and modifies Strong Attacks, R1 interacts and R3 controls enemy lock-on.
How do you perform a Strong Attack?
Hold R2 and press the directional strike button. Use R2 plus Triangle for a Strong Head Attack, R2 plus X for the body, R2 plus Square for the left or R2 plus Circle for the right.
How do you change combat style?
Tap R2 or RT. The new style may change the weapon's stance, attack path or damage type.
How do you switch weapons?
Hold R2 or RT and move the right stick toward the desired weapon.
How do you block?
Hold L2 or LT. Maintaining the defensive stance also helps restore stamina.
How do you parry?
Tap L2 or LT shortly before the attack connects. Successful timing interrupts the enemy and creates a strong counter window.
How do you dodge?
Press L1 or LB once for a short dodge.
How do you roll?
Press L1 or LB twice in succession.
What do the coloured outlines mean?
Green indicates high effectiveness, yellow indicates reduced effectiveness and red indicates a poor weapon, style or target choice.
Why is my weapon bouncing off armour?
The attack direction or damage type is ineffective. Target another body area, change combat style or equip another weapon.
How do you recover stamina quickly?
Hold the defensive stance to use the Breath of the Defender. Successful parries also provide a brief aggressive stamina advantage.
How do you sharpen weapons?
Use D-Pad Left. Quick sharpening restores edge performance but consumes permanent durability.
How do you heal?
Press D-Pad Down when the enemy is recovering or cannot immediately reach Aran.
How do you call Adso?
Press D-Pad Right. The same command dismisses him.
What does the quill do?
D-Pad Up requests contextual guidance related to navigation, objectives or Adso's knowledge.
How do you open the Travel Book?
Press the Touch Pad on PlayStation or View on Xbox.
How do you activate Photo Mode?
Hold R2 and press the Touch Pad on PlayStation, or use RT plus View on Xbox.
Can keyboard and mouse controls be remapped?
Yes. Version 2.0 adds full keyboard-and-mouse remapping.
Should I always lock onto an enemy?
Use lock-on during deliberate duels and directional targeting. Release it in crowded fights or whenever it prevents you from seeing additional attackers.
Is a Strong Attack always better?
No. Strong Attacks require more time and commitment. Use regular strikes during uncertain exchanges and Strong Attacks during confirmed openings.
Final Control Advice
The most important Blades of Fire control lesson is to treat the controller as a map of the opponent. Do not ask only which attack is strongest; ask which body part is exposed and which damage type can penetrate it.
Tap R2 to test another style before replacing a useful weapon, keep enough stamina for defence and reserve Strong Attacks for parries, staggers and recovery windows. A deliberate green strike is worth more than an entire red combination.
Continue with our Blades of Fire Tips and Tricks Guide for forging, weapon families, armour weaknesses, sharpness, durability, Adso, exploration, boss preparation and Version 2.0 advice.
Comments
No comments yet. Be the first to share your thoughts!