Rise of the Ronin has a fast, layered control scheme built around three ideas: deflect attacks with Counterspark, manage Ki with Blade Flash, and change Combat Styles whenever an opponent has an advantage over your current stance. Exploration adds its own commands for the grappling rope, glider, horse, stealth, firearms and four quick-item slots.
The default controller layout can initially feel unusual because Triangle is used for Counterspark rather than a conventional heavy attack. This placement is intentional: Counterspark is both an offensive strike and your primary timed deflection, so it must remain easy to reach throughout almost every fight.
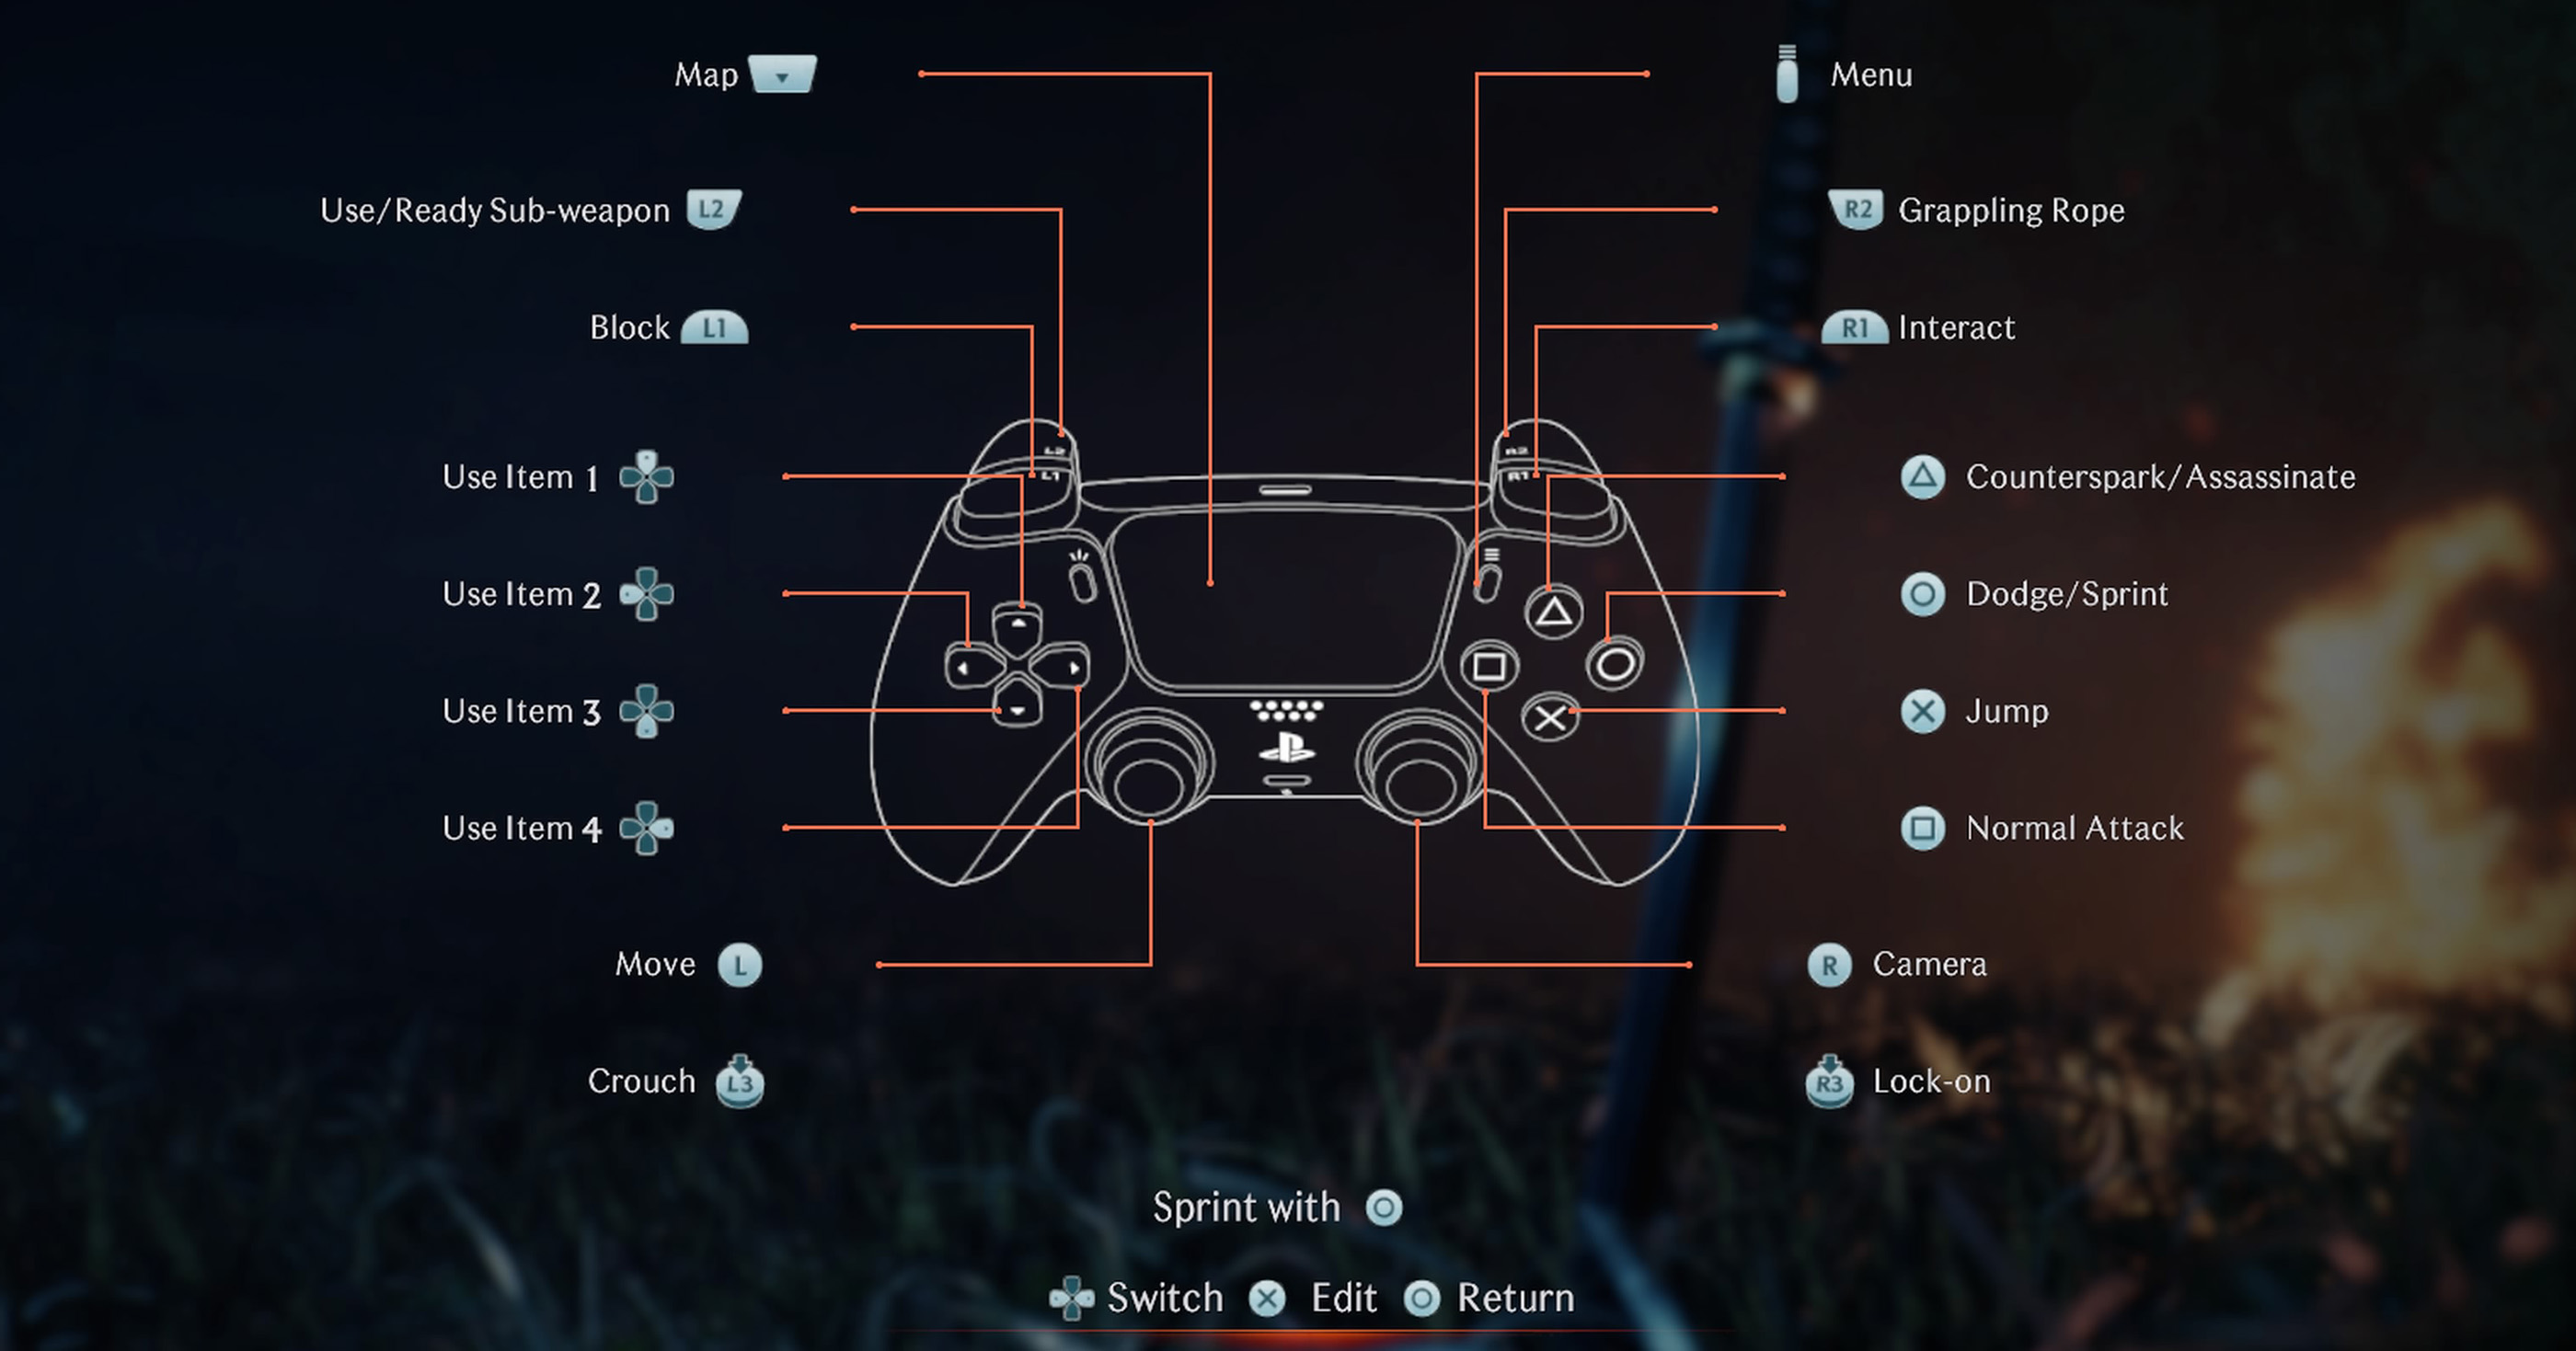
This guide explains the default PlayStation 5 controls shown in the game, practical PC inputs, combat combinations, sub-weapons, stealth, traversal, horseback commands, the glider and useful remapping advice.
Rise of the Ronin Controls
| Action | PlayStation 5 | PC Keyboard and Mouse |
|---|---|---|
| Move | Left Stick | W / A / S / D |
| Move Camera | Right Stick | Mouse |
| Sprint | Hold Circle while Moving | Assigned Sprint Key |
| Dodge | Circle | Assigned Dodge Key |
| Crouch | Press L3 | Assigned Crouch Key |
| Jump | Cross | Space |
| Normal Attack | Square | Left Mouse Button |
| Counterspark / Timed Deflection | Triangle | Assigned Counterspark Key |
| Assassinate Unaware Enemy | Triangle when Prompted | Assigned Assassinate Input |
| Block | Hold L1 | Assigned Block Key |
| Interact | R1 | Assigned Interact Key |
| Use Grappling Rope | R2 | Assigned Grappling Rope Key |
| Ready Sub-Weapon | Hold L2 | Right Mouse Button / Assigned Aim Key |
| Use or Fire Sub-Weapon | L2 + R2 | Aim + Fire |
| Lock On to Enemy | Press R3 | Assigned Lock-On Key |
| Change Locked Target | Move Right Stick while Locked On | Move Mouse / Assigned Target Keys |
| Use Item 1 | D-Pad Up | Assigned Quick-Item Key |
| Use Item 2 | D-Pad Left | Assigned Quick-Item Key |
| Use Item 3 | D-Pad Right | Assigned Quick-Item Key |
| Use Item 4 | D-Pad Down | Assigned Quick-Item Key |
| Open Map | Touchpad | M |
| Open Main Menu | Options Button | Esc |
| Switch Combat Style | Hold R1 + Assigned Face Button | Assigned Style-Selection Inputs |
| Use Martial Skill | Hold R1 + Face Button | Assigned Martial Skill Input |
| Blade Flash | R1 after Attacking | Assigned Blade Flash Input |
| Switch Primary Weapon | R1 + D-Pad Direction / Displayed Input | Assigned Weapon-Switch Key |
| Switch Sub-Weapon | Hold L2 + Displayed Directional Input | Assigned Sub-Weapon Selection Key |
| Critical Hit | Triangle near Ki-Broken Enemy | Assigned Critical Hit Input |
| Use Counterspark while Airborne | Triangle in Air, when Available | Assigned Counterspark Input in Air |
| Grappling Rope Attack | R2 toward Valid Enemy, then Square | Grapple, then Attack |
| Pull Object with Grappling Rope | R2 when Grapple Prompt Appears | Assigned Grappling Rope Key |
| Glide | Cross while Airborne after Avicula Is Unlocked | Assigned Glider Input |
| Descend while Gliding | Adjust Left Stick / Release Lift | Movement Inputs |
| Call Horse | Use Horse Flute from Quick Items | Assigned Horse-Flute Quick Item |
| Mount Horse | R1 near Horse | Interact |
| Dismount Horse | Cross / Displayed Dismount Input | Assigned Dismount Key |
| Horse Sprint | Hold Circle while Riding | Assigned Sprint Key |
| Horse Jump | Cross while Riding | Space / Assigned Jump Key |
| Horse Attack | Square while Riding | Attack Input |
| Take Photograph | Equip Camera, Aim and Use Displayed Shutter Input | Equip Camera and Use Assigned Shutter Input |
| Activate Auto-Run toward Marker | Use Displayed Travel Command | Assigned Auto-Run Input |
| Pause | Options Button | Esc |
PC note: Rise of the Ronin supports customizable keyboard and mouse inputs. Exact default keyboard bindings may vary with the selected control preset, so verify them under Settings > Controls. The PlayStation entries above follow the default Sprint controller preset shown in the game.
Understanding the Default Controller Layout
The layout separates basic actions from advanced combat commands:
- Square handles ordinary weapon attacks.
- Triangle performs Counterspark, assassinations and Critical Hits when the relevant prompt is available.
- L1 provides a conventional guard.
- R1 acts as an interaction button outside combat and a combat-technique modifier during battle.
- Circle dodges when tapped and sprints when held while moving.
- R2 operates the grappling rope unless it is being combined with a sub-weapon command.
Because several buttons are contextual, the action performed depends on whether you are exploring, locked onto an enemy, holding a modifier or standing near an interactive object.
Moving, Sprinting and Dodging
Move with the left stick and control the camera with the right stick. Hold Circle while moving to sprint. Tap Circle during combat to dodge.
Do Not Mash Circle to Sprint
Holding the button produces a steady sprint. Repeated taps may cause unnecessary dodges and consume Ki when an enemy is nearby.
Dodge with a Direction
A neutral dodge may not move you far enough from a long-reaching attack. Push the left stick sideways or diagonally while pressing Circle.
Sprinting Uses Ki
Running into a fight with an empty Ki gauge places you at an immediate disadvantage. Release sprint shortly before reaching an enemy camp.
Use Sprint to Reposition, Not Only to Travel
A short sprint can move you around shield users, leave an explosive area or create enough distance to ready a firearm.
Crouching and Stealth
Press L3 to crouch. While crouched, move behind unaware enemies and use Triangle when the assassination prompt appears.
Watch the Awareness Indicators
Enemies begin investigating before they fully detect you. Stop moving or break line of sight when the awareness meter starts filling.
Use Grass and Elevation
Tall grass hides the ronin effectively, while roofs and cliffs provide routes around guarded entrances.
Assassinate Dangerous Targets First
Prioritise leaders, firearm users and enemies with awkward weapons. Eliminating the strongest opponent can turn a difficult camp into a manageable fight.
Do Not Crouch Everywhere
Crouching is slower. Once the remaining enemies have been alerted, stand up and use normal combat movement.
Normal Attacks
Press Square for a normal attack. Repeated presses create the basic sequence associated with the current weapon and Combat Style.
Short Combos Are Safer
Use one or two attacks, then watch the opponent. Long strings can be interrupted by hyper-armoured attacks or an enemy entering from off-screen.
Different Weapons Have Different Recovery Times
An odachi commits the character for longer than paired swords. Learn when each weapon can safely stop attacking and return to defence.
Attack after a Successful Deflection
Counterspark can panic an opponent and reduce Ki. Use the opening for a short combination rather than immediately attempting another risky deflection.
Blocking
Hold L1 to block eligible attacks. Blocking is reliable but consumes Ki.
Blocking Is Not a Failure
Counterspark is powerful, but ordinary blocking is the correct answer when you do not yet understand an enemy's timing.
Watch Your Ki While Guarding
If the gauge is almost empty, disengage before another hit breaks your stance.
Block the First Part of an Unfamiliar Combo
Once the rhythm becomes clear, try using Counterspark against the final or most predictable strike.
Do Not Block Every Red Attack
Powerful red-glowing Martial Skills generally demand a correctly timed Counterspark or a dodge. Ordinary guard may be broken or bypassed.
Counterspark
Press Triangle to perform Counterspark. The move swings your weapon while creating a brief deflection window.
A successful Counterspark can:
- Deflect an incoming strike.
- Inflict Ki damage.
- Panic the enemy.
- Interrupt some Martial Skills.
- Create an opening for a Critical Hit later in the exchange.
Press It when the Attack Reaches You
React to the weapon's final forward movement rather than its initial wind-up. Many enemies pause or vary their timing specifically to punish early inputs.
Do Not Counterspark Every Hit in a Long Combo
Block the difficult early swings and deflect the attack whose timing you recognise most clearly.
Different Styles Change the Animation
Counterspark speed and active timing vary between Combat Styles. Switching styles can change more than the affinity icon.
Use Sound as a Timing Cue
The impact sound and visual flash of a successful deflection make it easier to learn the correct rhythm.
Counterspark Is Still an Attack
Even when no strike is deflected, the animation may hit the enemy. However, using it randomly can leave you exposed during recovery.
Red Martial Attacks
Dangerous attacks are signalled by a red visual effect. These moves usually cause heavy health or Ki damage.
Wait for the Actual Strike
The red flash warns that the Martial Skill is coming; it does not always mark the exact moment to press Triangle.
Distance Changes Timing
A charging enemy may flash red several metres away. Deflect when the attack enters range, not when the charge begins.
Dodge when the Animation Is Unfamiliar
Survival is more valuable than forcing a deflection attempt. Observe the move and try Counterspark on the next repetition.
Some Red Sequences Have Several Hits
A successful deflection against the first swing may not end the entire technique. Remain ready to block, dodge or Counterspark again.
Ki and Ki Management
Ki powers attacks, dodges, sprinting and defence. Emptying the gauge leaves the ronin vulnerable to a stance break.
Never Begin a Duel with Empty Ki
Stop sprinting before reaching the enemy and allow the gauge to recover.
Do Not Spend the Final Portion on a Greedy Attack
Leave enough Ki for a dodge or block.
Pressure Low-Ki Enemies
When an opponent's Ki bar is close to empty, a well-timed Counterspark or Martial Skill can create a Critical Hit opening.
Back Away after Being Ki-Broken
Once control returns, create distance rather than immediately restarting the same combination.
Blade Flash
Press R1 after attacking to perform Blade Flash. The ronin flicks blood from the weapon and recovers Ki based on the amount of blood accumulated.
Use It after a Completed Exchange
Blade Flash is most effective after several connected attacks, when the weapon has accumulated enough blood to restore a meaningful amount of Ki.
Do Not Use It in the Middle of an Incoming Strike
The animation can be punished. Create a small opening first.
Build It into Muscle Memory
Attack, observe the enemy and tap R1 when the exchange ends. Consistent Blade Flash use greatly improves combat endurance.
Use Violent Gale when Appropriate
Switching styles during a combat sequence can trigger an offensive transition after the relevant skill is unlocked, letting you maintain pressure while adapting affinity.
Combat Styles
Each primary weapon can use several Combat Styles. Hold R1 and press the displayed face button to switch between equipped styles.
Styles have affinities against different enemy weapon categories:
- Ten: Typically effective against certain conventional weapons.
- Chi: Favours a different group of weapon matchups.
- Jin: Provides another set of advantages.
- Shinobi: Can be technically disadvantaged but rewards precise Countersparks with strong Ki damage.
Read the Affinity Arrow
A favourable style displays a positive indicator beside the locked enemy. Switch when the game shows that your current style is poorly matched.
Affinity Is Not the Only Factor
A familiar neutral style may perform better than an advantageous style whose Counterspark timing you have never practised.
Equip Complementary Styles
Try to cover several opponent weapon types rather than equipping three styles with similar strengths.
Practise at the Dojo
Training reveals how each style handles Counterspark, Martial Skills and combo recovery without risking mission resources.
Martial Skills
Hold R1 and press the corresponding face button to activate a Martial Skill assigned to the current Combat Style.
Do Not Use Martial Skills Only for Damage
Some skills close distance, evade attacks, pressure Ki or reposition behind the target.
Match the Skill to the Opening
Fast techniques suit short staggers. Slow, powerful moves should be saved for panicked or Ki-broken opponents.
Watch Ki Cost
A powerful technique can leave you unable to defend when it fails to end the fight.
Switch Styles to Access Different Skills
Your available Martial Skills change with the active style, giving each weapon a larger practical moveset than the basic attack string suggests.
Lock-On Controls
Press R3 to lock onto an enemy. Move the right stick to change targets.
Lock On during Duels
It keeps both fighters visible and displays the enemy's health, Ki and style-affinity information.
Unlock in Large Groups
Free camera movement can be more useful when surrounded or trying to escape through a doorway.
Do Not Switch Targets Accidentally
Large right-stick movements while locked on may select another enemy. Use smaller camera adjustments.
Prioritise Ranged Enemies
Switch lock-on to riflemen or archers when they begin preparing an attack, then reposition behind cover or interrupt them.
Critical Hits
When an enemy's Ki is fully depleted and their stance breaks, approach and press Triangle to perform a Critical Hit.
Do Not Delay
The opening is temporary. Stop using ordinary attacks and move into the prompt range immediately.
Clear Nearby Enemies First when Possible
A Critical Hit animation can leave another opponent close enough to attack as control returns.
Use the Grappling Rope to Reach the Target
Some skills and situations allow you to close distance quickly after breaking the enemy's Ki.
Bosses May Need Several Ki Breaks
One Critical Hit may remove only part of a powerful opponent's health. Reset your Ki and prepare for the next phase.
Sub-Weapons
Hold L2 to ready the equipped sub-weapon and use the displayed fire input, commonly R2, to attack.
Sub-weapons include:
- Handguns.
- Rifles.
- Bows.
- Shuriken.
- Fire-based or specialised ranged tools.
Firearms Can Interrupt Enemies
A well-timed handgun shot may stagger an opponent or punish an exposed animation.
Bows Reward Stealth
Use headshots against isolated guards before entering a camp.
Shuriken Support Mobility
They can pressure enemies while you reposition and may be easier to weave into close combat.
Do Not Aim in the Open
Readying a sub-weapon limits your immediate defensive options. Create distance or use cover first.
Restock Before Major Missions
Check ammunition and equipped sub-weapons at a banner or merchant before beginning a long combat sequence.
The Grappling Rope
Press R2 when a valid grappling point is highlighted.
The rope can be used to:
- Reach elevated platforms.
- Swing across gaps.
- Pull explosive barrels or objects.
- Move environmental hazards.
- Attack or reposition around enemies.
- Enter camps from unexpected directions.
Look for White Grapple Markers
Not every beam or roof accepts the rope. Aim the camera until a valid prompt appears.
Use Hanging Objects as Weapons
Pulling a suspended object onto enemies can remove several guards without spending ammunition.
Grapple before Jumping into Danger
Survey the landing area first. Reaching a roof silently is useful only when you do not land in front of a guard.
Combine the Rope with an Attack
Unlocked rope techniques can pull you toward enemies or launch attacks from unusual angles.
Quick Items
The four D-Pad directions activate the four assigned items.
Useful quick-item choices include:
- Medicinal Pills.
- Elixirs or status-curing items.
- Weapon-enhancing items.
- Horse Flute.
- Combat consumables.
Keep Healing on a Consistent Direction
Always placing medicine on the same D-Pad input prevents mistakes during boss fights.
Do Not Fill Every Slot with Healing
One or two recovery options usually leave enough room for a useful buff, cure or Horse Flute.
Review Item Presets
Later game systems allow different item arrangements. Prepare separate exploration and difficult-combat configurations where available.
Jumping and the Glider
Press Cross to jump. After obtaining the Avicula, use the airborne glider command to cross large gaps and descend from high ground.
Jump before Deploying
Clear the edge of a roof or cliff so the glider does not collide with nearby geometry.
Use Height to Build Range
The glider maintains forward travel better when launched from towers, cliffs and rooftops.
Look for Mid-Air Grapple Points
Some routes combine gliding and grappling to reach hidden areas.
Do Not Land in the Centre of an Enemy Camp
Circle the area from above and choose grass, a rooftop or an isolated guard as the landing target.
Horse Controls
Use the Horse Flute to summon your horse, then press R1 nearby to mount.
Use Auto-Run for Long Roads
After placing a map marker, the automatic travel option can follow roads toward the destination.
Watch for Enemy Roadblocks
Auto-travel does not make the journey completely safe. Remain ready to take control.
Attack from Horseback Carefully
Mounted attacks are useful against weak roadside enemies but provide less precise defence than fighting on foot.
Dismount before Tight Terrain
The horse can become awkward inside camps, narrow alleys and steep mountain paths.
Map and Fast Travel
Open the map with the touchpad. Select an unlocked banner or other eligible point to fast travel.
Place a Marker before Riding
A clear destination makes auto-run and route planning more reliable.
Activate Veiled Edge Banners
Banners restore resources, provide checkpoints and unlock convenient travel positions.
Use the Map to Track Regional Completion
Public-order areas, fugitives, shrines, cats, treasure chests and photographs contribute to regional bonds and rewards.
Zoom In before Following an Icon
A marker may sit above a cave, below a cliff or on another side of a river.
Changing the Control Preset
The controller menu includes several presets and allows fine-tuning of individual actions. The attached screen shows the Sprint (Default) preset.
Do Not Remap Triangle Immediately
Counterspark appears constantly in combat, assassinations and Critical Hits. Play several encounters before moving it.
Consider Separating Sprint and Dodge
Players who accidentally dodge while attempting to run may prefer another preset or a custom layout.
Keep Block and Counterspark Distinct
The two actions serve different defensive purposes. A layout that causes confusion between them will make difficult duels significantly harder.
Test Every Context after Remapping
Check stealth, horseback riding, gliding, grappling and sub-weapons—not only basic sword combat.
Use the Reset Option when Combinations Conflict
Contextual and modifier commands can overlap. Restore the preset if a custom binding prevents a Martial Skill or traversal action from working.
Recommended Control Settings
Auto-Lock after an Attack
Enable helpful lock-on behaviour when you frequently lose targets during crowded battles. Disable it when the camera keeps selecting an unwanted enemy.
Camera Speed
Use a speed high enough to track enemies circling behind you but low enough for accurate bow and rifle aiming.
Aim Assistance
Moderate assistance can make controller shooting more comfortable without removing the need to select good angles.
Hold or Toggle Options
Review hold-duration settings for actions such as aiming or sprinting when extended trigger pressure causes discomfort.
Control Reminders
Keep reminders enabled while learning Blade Flash, Martial Skills and contextual grappling actions. They can be reduced later for a cleaner interface.
Frequently Asked Questions
How do you attack in Rise of the Ronin?
Press Square for a normal attack. Hold R1 and press an assigned face button to use a Martial Skill.
How do you parry?
Press Triangle shortly before an enemy attack connects. The game calls this action Counterspark.
How do you block?
Hold L1. Blocking consumes Ki but is safer than attempting to deflect an unfamiliar attack.
How do you dodge?
Tap Circle with a movement direction.
How do you sprint?
Hold Circle while moving when using the default Sprint preset.
How do you crouch?
Press L3.
How do you assassinate enemies?
Approach an unaware enemy while hidden or crouched and press Triangle when the prompt appears.
How do you use Blade Flash?
Press R1 after landing attacks. The move removes blood from the weapon and restores Ki.
How do you change Combat Styles?
Hold R1 and press the face button assigned to the desired style.
How do you use Martial Skills?
Hold R1 and press the corresponding assigned face button while the relevant Combat Style is active.
How do you lock onto an enemy?
Press R3. Move the right stick to switch targets.
How do you perform a Critical Hit?
Deplete the enemy's Ki, approach during the stance-break opening and press Triangle.
How do you use a gun or bow?
Hold L2 to ready the sub-weapon, aim and press the displayed firing command, normally R2.
How do you use the grappling rope?
Aim the camera at a valid grappling point and press R2.
How do you heal?
Assign a medicinal item to a D-Pad quick slot and press that direction during play.
How do you summon the horse?
Assign or select the Horse Flute and use it from the quick-item controls.
Can you remap the controls?
Yes. Controller presets and action fine-tuning are available, while the PC edition supports customizable keyboard and mouse inputs.
Why does Counterspark sometimes fail?
The input may be early or late, the selected Combat Style may have a different animation, or the enemy's technique may contain delayed and multiple strikes.
What is the most important control to learn?
Counterspark is central to difficult combat, but Blade Flash is nearly as important because it keeps your Ki available for defence and offence.
Final Control Advice
Rise of the Ronin becomes much easier when Triangle is treated as a precisely timed attack rather than a panic-parry button. Block unfamiliar combinations, study the final motion of each strike and use Counterspark only when the timing becomes readable.
Press R1 after successful attack sequences to recover Ki with Blade Flash, and switch Combat Styles whenever the affinity indicator shows that your current approach is disadvantaged. Outside battle, use the grappling rope, glider and horse together rather than treating them as separate travel systems.
Continue with our Rise of the Ronin Tips and Tricks Guide for combat, exploration, equipment, bonds, skill progression and Midnight difficulty advice.
Comments
No comments yet. Be the first to share your thoughts!